Using the Advanced Forms Editor |
  
|
Using the Advanced Forms Editor |
|
The Advanced Forms Editor takes the existing principle of user-definable questions and clauses a bit further by allowing the entire form to be seen in the editor and amended (with some restrictions).
Activating the Advanced Forms Editor
First, go to Mobile > R. Forms (Setups & Send). Click OK to the Warning.
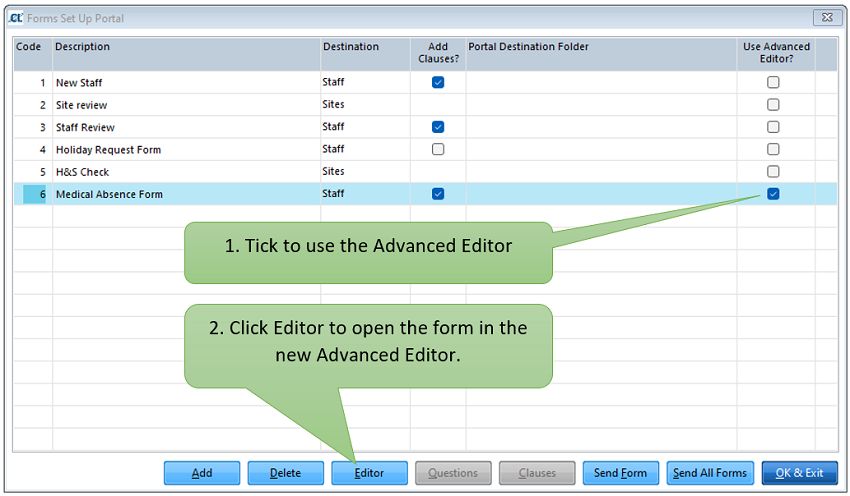
Ticking the Use Advanced Editor? button will enable the Editor button and disable the Questions and Clauses buttons. You will then get a prompt to load a default template based on your current questions and clauses.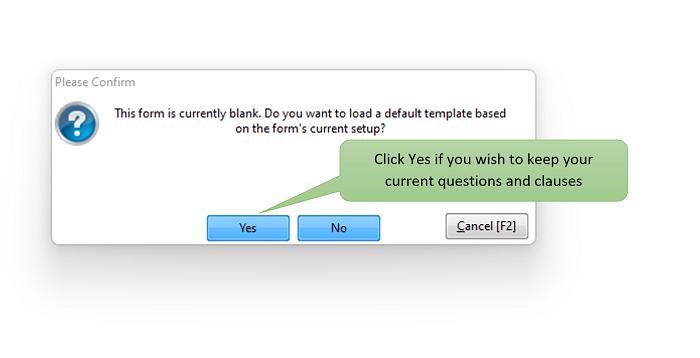
If at any point you want to revert the form back to its original behaviour just untick the Use Advanced Editor box. The contents of the Advanced Editor will remain intact and be available if you choose to switch back.
Using the Advanced Forms Editor
Once you have opened a form in the new editor, you have the opportunity to add new lines to the form, move existing lines up and down, and even define sub-forms that appear when you enter particular values in Selection and Yes/No boxes.
Using the Insert Above or Insert Below buttons you can position your new line precisely where you want it. The F4 button on the keyboard can also be used, which will behave in the same way as the Add Below button.

Each line must have a Type (the first column), and it is this which determines how the line will appear and behave on the mobile device.
Available Line Types are:
| Account Number | A specially formatted box for entering an Account Number. |
| Header | A large Header used to define a section of the form. |
| Subheader | A smaller Header, useful for breaking up sections of a form. |
| Comment | A large, free format text box. |
| Date | Opens a Date picker. |
| NI Number | A specially formatted box for entering an NI Number. |
| Photo | Allows the user to take an upload a photo. |
| Score | A specially formatted box for entering scores from 0-5 |
| Selection | Opens a window with a list of options, forcing the user to pick from a predetermined list. |
| Signature | Presents a box that allows the user to enter their signature. |
| Site Selection | A special selection box that list all Clients/Sites loaded onto that mobile device. |
| Sort Code | A specially formatted box for entering a bank Sort Code. |
| String | A text box, useful for smaller pieces of text, or number fields. |
| Yes/No | A special selection box, containing just the two options (although other selections can be added if required) |
There are also additional options available for each line, which options depends on what Line Type has been selected.
| Photo Required | This adds a compulsory photo below the field |
| Answer | Required If selected, an answer must be given before the form can be submitted |
| Bold | This allows the text to be displayed in a bold font to add emphasis |
| Uppercase | This forces any entered text into capitals |
| Maximum Length | This limits the number of characters that can be entered |
| Default Value | Populates the field on new forms with the specified value. Handy for picking a default on selection lists. |
| Include | Untick this box to hide the field on the mobile device. Unprotected lines can be deleted, but that is permanent. This allows you to hide them but keep the field in the editor for reference, or re-instating later. |
If a tick box is not visible on a line, or you can’t park the cursor in a particular column, that option is not supported for the selected line type.
Protected Lines
The New Staff, Site Review and Staff Review forms each have their own set of hard-coded fields that must be retained. These fields have an indicator in the Protected column and their text is shown in a paler font than amendable lines. However, they can be moved around on the form and other fields or headers be added around them.
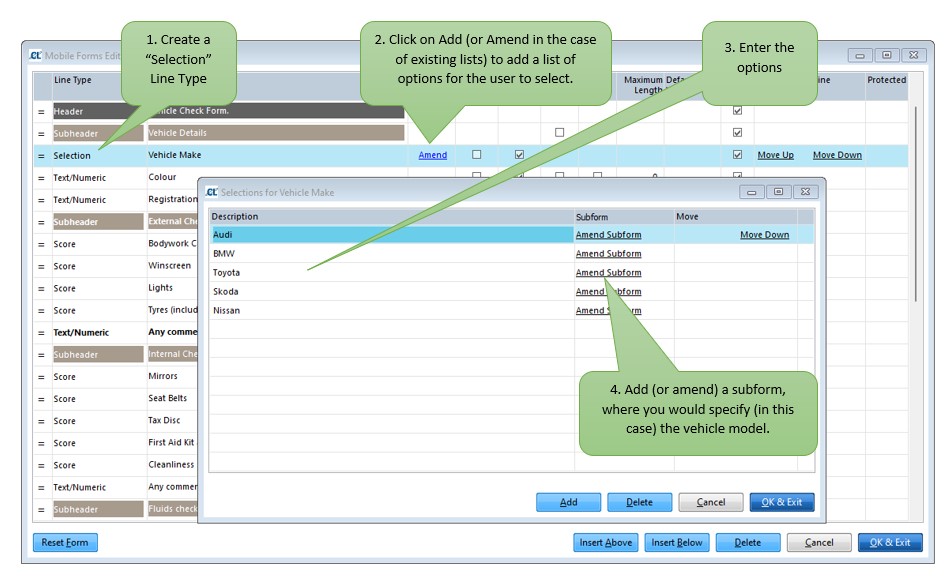
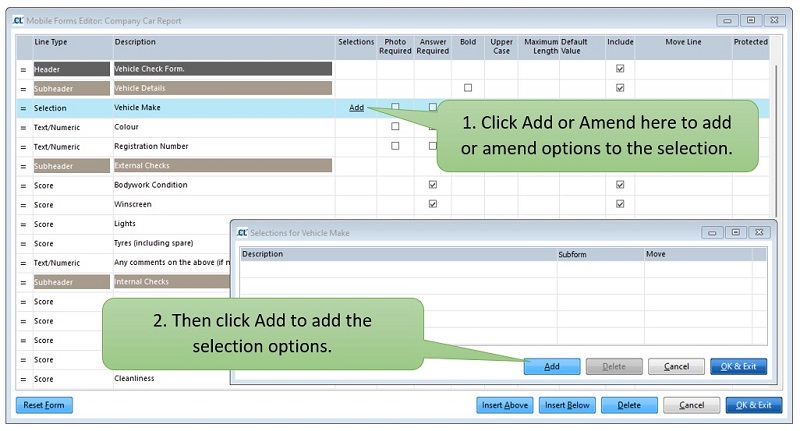
Selection Boxes
For Selection fields you will see an Add or Amend link in the Selections column. This opens up a window in which you can define each of the options that you want to appear in the selection field.
The same applies to Yes/No boxes. The only difference is tha these must always include both the Yes and No options, however you can add other options if required.
Subforms
For selection boxes and Yes/No fields, it is possible to attach a subform to any one of the options in the selection list. A subform is a set of fields that only appear on the mobile device when that option is selected.
Clicking on Add Subform in the Selections list will open a new editor window where you can start to add a new set of controls.
For example, say you wanted to add a selection list to choose the type of company car an employee is given. The first step would be to create a selection list for the manufacturer name: