Staff and Annualised Pay |
  
|
Staff and Annualised Pay |
|
Annualised Pay functionality has been developed within CleanLink Site Manager to facilitate customers that employ staff whose pay is spread equally across the year. This accounts for certain types of contract (often educational establishments) which do not require cleaning for a full 52 weeks of the year.
The system has been designed to calculate annualised pay and holiday pay (where applicable) based upon the details entered by the user and to automatically calculate additions or deductions which need to be processed each pay period for employees who work above or below their contracted hours.
CleanLink Site Manager’s Annualised Pay has been developed to support all types of payroll processing, including manual adjustments to regular pay within the pay cycle, timesheet imports, including Excel Timesheets, Mobile Timesheets, Portal Timesheets, and imported Time & Attendance transactions.
This guide is aimed to walk users through the setup procedure to enable annualised pay and details of how to process the pay cycle for annualised pay.
Annualised pay can be set up for one or more employees, having a mixture of employees being paid on an annualised basis and employees being paid standard hourly pay is absolutely fine. Annualised pay is set up per employee per site, meaning it is possible for an employee to be paid annualised pay on one site and standard hourly pay on another site if necessary.
Our team has done its best to minimise the changes required within the system to set up and process pay for annualised employees alongside standard hourly paid employees. Some areas of the pay cycle processing have not changed with the introduction of annualised pay; therefore, we hope users find the process as efficient as possible.
In order to use Annualised Pay functionality within the system the user must first complete some basic pay cycle setups. Annualised pay can be activated on a cycle-by-cycle basis, meaning not all pay cycles need to have the functionality enabled if it is not required.
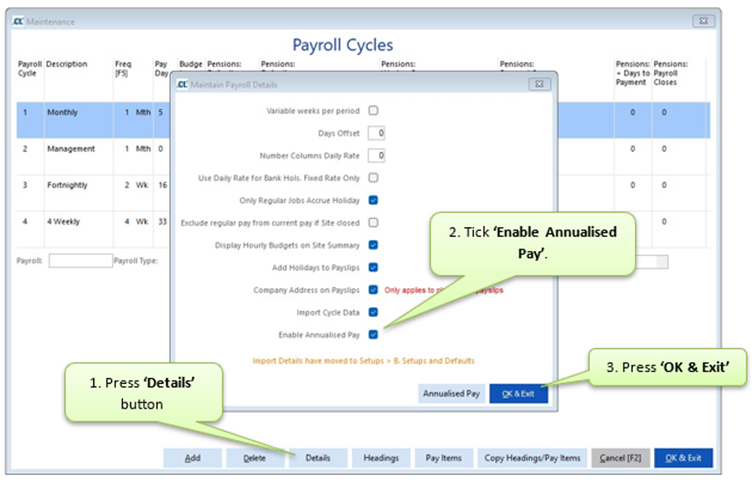
To enable a pay cycle to use Annualised Pay follow the below steps:
Go to Setups> K. Payroll Cycles> Select the relevant Cycle> press ‘Details’> tick ‘Enable Annualised Pay’> press ‘OK & Exit’
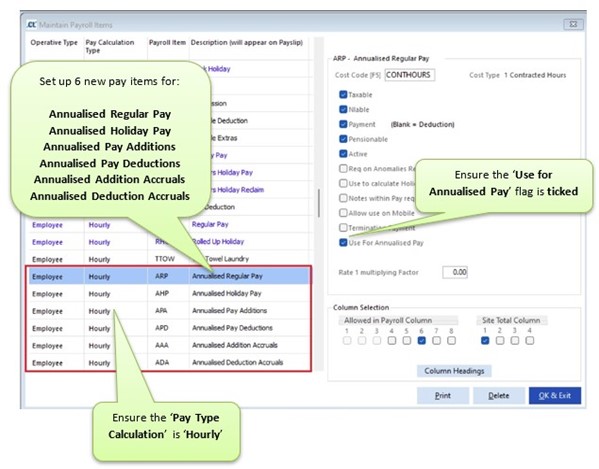
The next step is to set up 6 new pay items to cover the different types of annualised pay, these will need to be set with the ‘Pay Calculation Type’ as ‘Hourly’ as the Sites will be set up as Hourly Pay with regular hours entered in order for the system to calculate the annualised pay value.
To do this go to Setups> K. Payroll Cycles> Select the relevant Cycle> press ‘Pay Items’.
Create 6 new pay items in the same way as usual for the following items.
●Annualised Regular Pay - this is the standard annualised pay that an employee will receive each period.
●Annualised Holiday Pay - this is the standard annualised holiday pay that an employee will receive each period. (This will only be used if the pay cycle is set to split annualised and holiday pay).
●Annualised Pay Additions - this will be used for any additional pay an employee might receive if they work extra hours in a pay cycle.
●Annualised Pay Deductions - this will be used for the pay an employee might be deducted if they do not work their agreed hours in a pay cycle. Please Note: Users will need to remove the ‘Payment’ flag when setting up this pay item as it needs to be a deduction.
●Annualised Additions Accruals - this can be optionally used to increase the holiday pay each period to account for working over the expected hours.
●Annualised Deduction Accruals - this can be optionally used to reduce the holiday pay each period to account for working under the expected hours. Please Note: Users will need to remove the ‘Payment’ flag when setting up this pay item as it needs to be a deduction.
Please Note: The descriptions above are examples only, users can choose their own descriptions for each pay item, however, we advise users to ensure the descriptions given will be understood by employees whose payslips will include the description.
The column numbers for these pay items will be determined by your cycle’s current headings, the ‘Column Headings’ button can be used to double check which column the user would choose the pay item to be visible within.
With these six pay items in place, return to:
Setups> K. Payroll Cycles> Select the relevant cycle> press ‘Details’> press ‘Annualised Pay’ button.
Within this screen, you must set the default configuration for annualised pay, this will include setting the defaults for new staff, assigning the relevant pay items, and choosing colours used to display variances in pay calculations. It is important to assign the pay items just created to their relevant pay type.
These defaults will be used for any employee who is flagged to be paid annualised pay, however, it is also possible to amend certain fields used for the calculation at employee level (such as weeks worked, holiday calculation method etc).
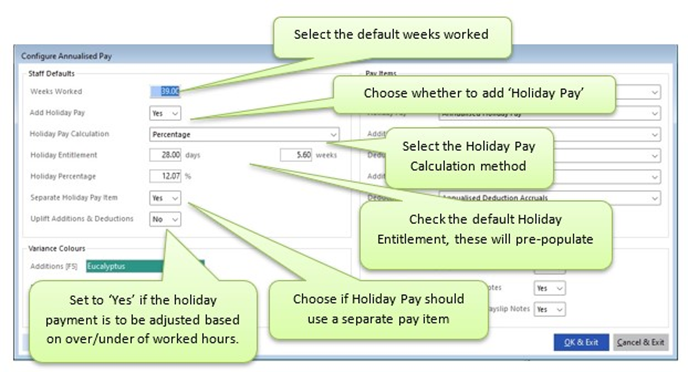
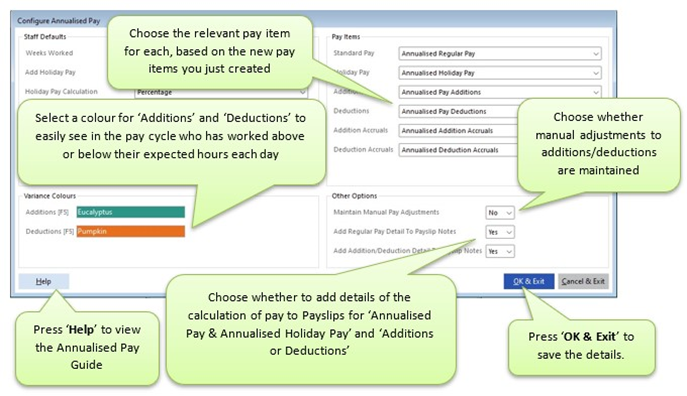
Please Note: Only users choosing to ‘Uplift Additions & Deductions’ are required to select pay items for ‘Addition Accruals’ or ‘Deduction Accruals’.
Repeat the above steps for all pay cycles which will require employees to be paid annualised pay. Please Note: Pay items can be copied from one pay cycle to another, if necessary, rather than manually creating annualised pay, pay items for each cycle. This can be done by going to Setups> K. Payroll Cycles> select cycle> ‘Copy Headings/Pay Items’ button.
Now that you have configured the pay cycle(s), you must now create some ‘Work Patterns’.
In order for annualised pay to calculate additions and deductions accordingly for each employee within the pay cycle, the system needs to understand when the employee is expected to be onsite. If the site is closed due to being outside term time and therefore not due to be cleaned, the employee isn’t expected to be at work and therefore shouldn’t be penalised for not attending.
Setting up Work Patterns will provide the system with the ‘Expected Hours’ each period for each employee which will be automatically compared with their ‘Actual Hours’ and the calculation of additions or deductions will be completed by the system.
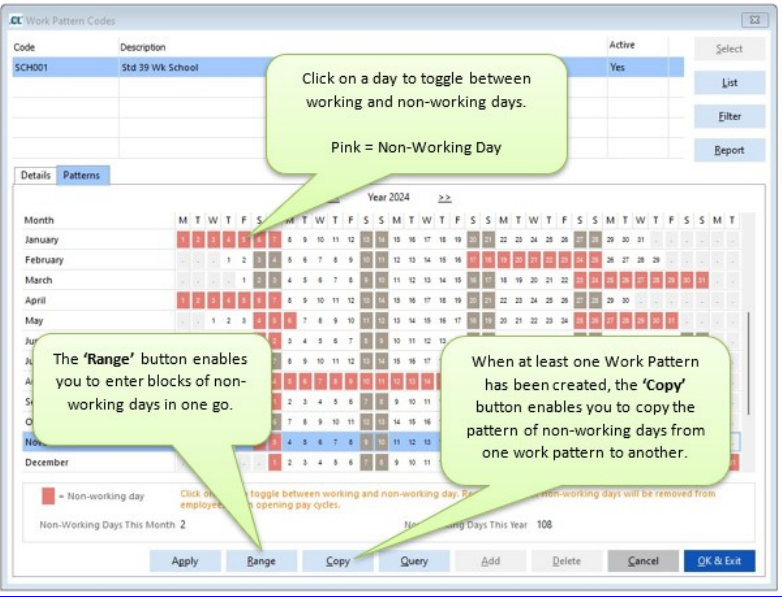
Users can create as many different work patterns as they wish, to allow for flexibility within the workforce. Work Patterns will be assigned at Site level, but can also be assigned to an employee on a specific Site at employee job level.
Work Patterns can be manually created and maintained as required, however, there is also the option to import Work Patterns in order to save time initially.
Work Pattern User Rights:
Any user wishing to create and maintain Work Patterns will require a new User Right in order to do so. The user right required is called ‘WrkPattMnt’ (Work Pattern Maintain). This will need to be applied to any user who will be required to create and maintain Work Patterns.
Users who simply need to view Work Patterns, but who won’t be required to create or modify Work Patterns will not need to be given additional user rights.
User Rights can be granted in the usual way by navigating to Setups> AA. Advanced> W. Maintain Users and ensure the ‘Supervisor’ user is logged into Site Manager when making the changes.
Manually Create and Maintain Work Patterns:
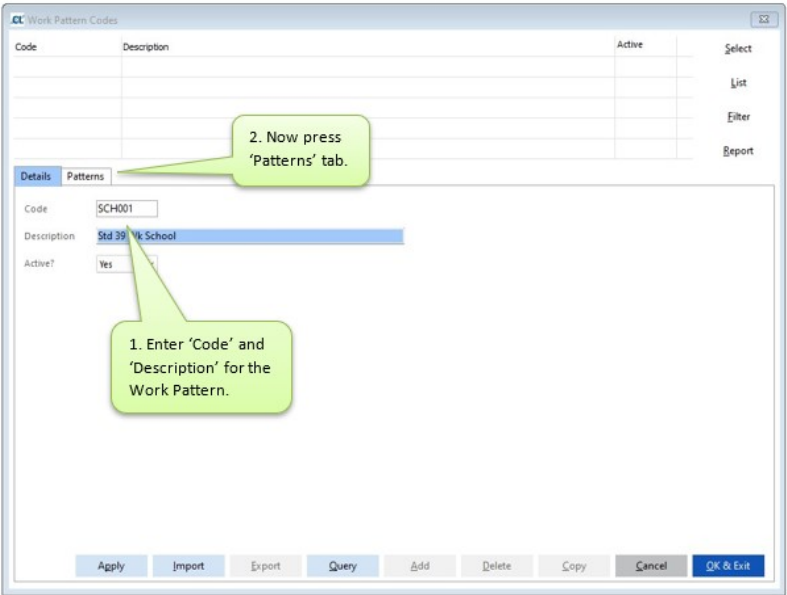
To set up Work Patterns manually go to Clients> G. Work Patterns. Within the ‘Details’ tab enter the ‘Code’ and ‘Description’ for the work pattern being created then press ‘Patterns’.
Importing Work Patterns:
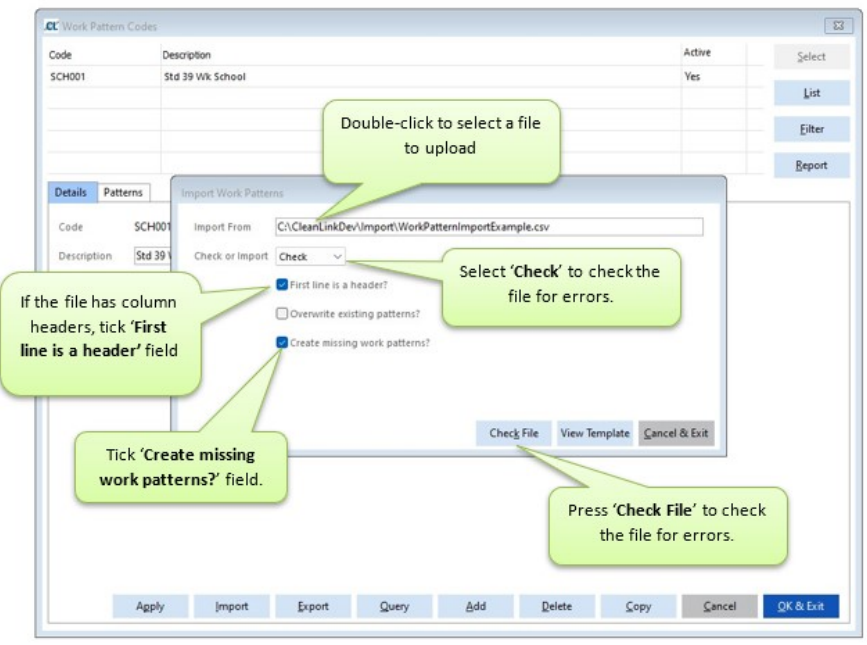
In order to import Work Patterns, rather than manually creating them, the user must first complete the ‘Work Pattern Template’ which can be found by going to Clients> G. Work Patterns> ‘Import’ button> ‘View Template’. Once the template has been populated, the file must be saved as a CSV.
To import the completed Work Pattern Template file, go to Clients> G. Work Patterns> ‘Import’ button.
Check File:
We recommend checking the file for errors prior to importing, to do this follow the below steps:
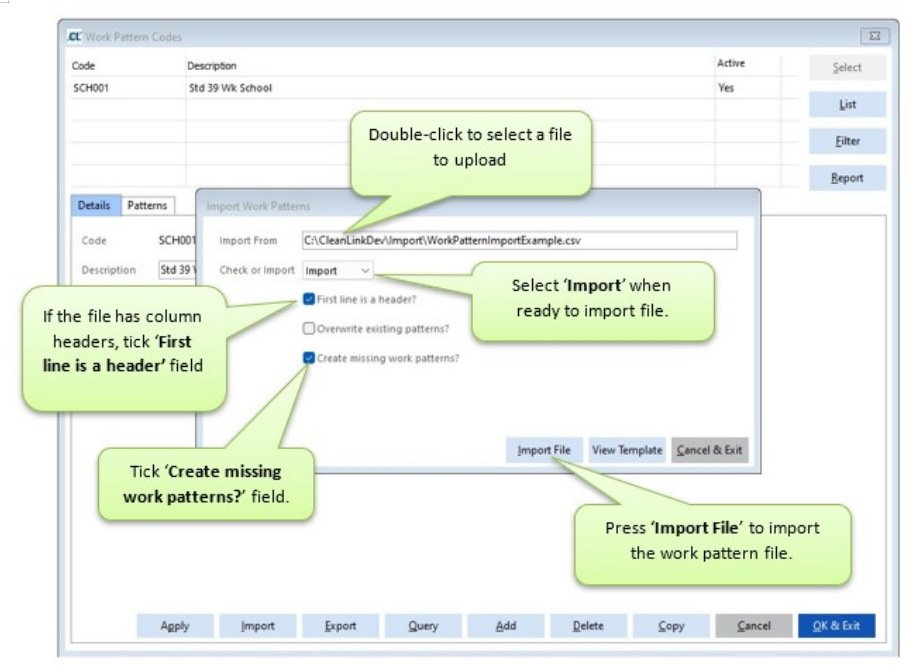
Import File:
After checking for errors and correcting any reported errors in the file and when ready to import the Work Pattern file, follow the below steps:
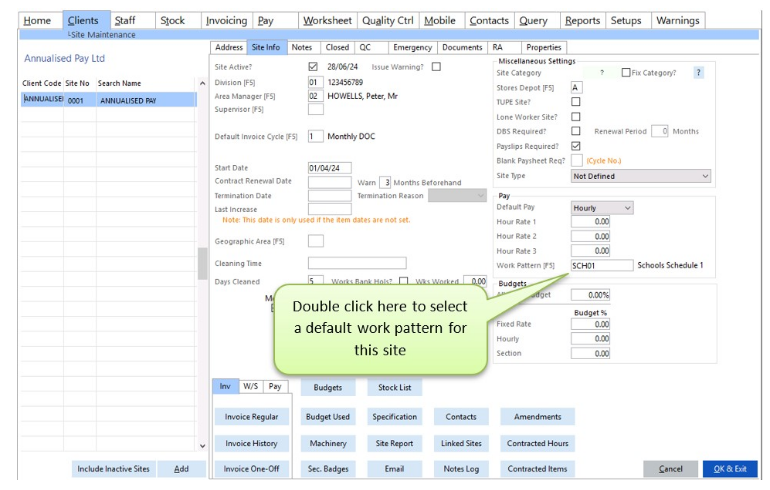
Once set up, Work Patterns can be assigned to Sites as a default for any annualised pay staff who may be added to that site.
This can also be overridden for individual staff if required. To set a default Work Pattern for a Site go to the Site> Site Info tab and double-click in the ‘Work Pattern’ field to select from a list of existing Work Patterns.
With annualised pay activated and work patterns created and applied to Sites, you can now set up your employee’s regular pay to use annualised pay.
The system can either convert existing regular pay (provided it is currently entered against hourly paid sites as hours at a rate of pay, using columns 1, 2 or 3), or add new jobs that will be paid on an annualised basis.
Please Note: Sites can have a mixture of employees set up within it, including standard hourly paid employees and annualised pay employees. This means there is no requirement to have different sites set up for annualised pay and standard hourly paid employees. Employees can only have one job per Site though, as is the case already, either standard hourly, or annualised pay.
To convert existing regular pay or add new jobs that will be paid on an annualised basis go to:
Staff> A. Staff Maintain> select employee> ‘Jobs’ button.
A new ‘Annualised Pay’ check box for hourly paid jobs will be visible. Ticking this field will convert the current job to annualised pay, using values initially defaulted from the pay cycle setup.
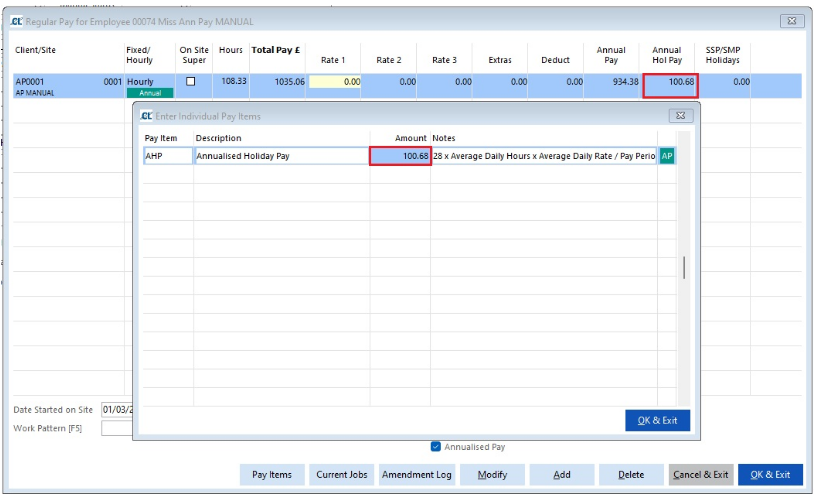
To view or amend those settings for each employee, double click or press ‘F5’ on the ‘Rate 1’ column next to ‘Total Pay’ column (highlighted yellow).
Here you will see the regular shift pattern for the employee and on the right a new section, with the various settings related to annualised pay…….
Example 1: Amending an existing employee to use Annualised Pay.
In this example we have an employee who is currently set as working 5 hours a day, Monday to Friday, on a monthly pay cycle. Their rate of pay is £11.50.
To convert the employee to annualised pay at this site, tick the Annualised Pay box as shown below:
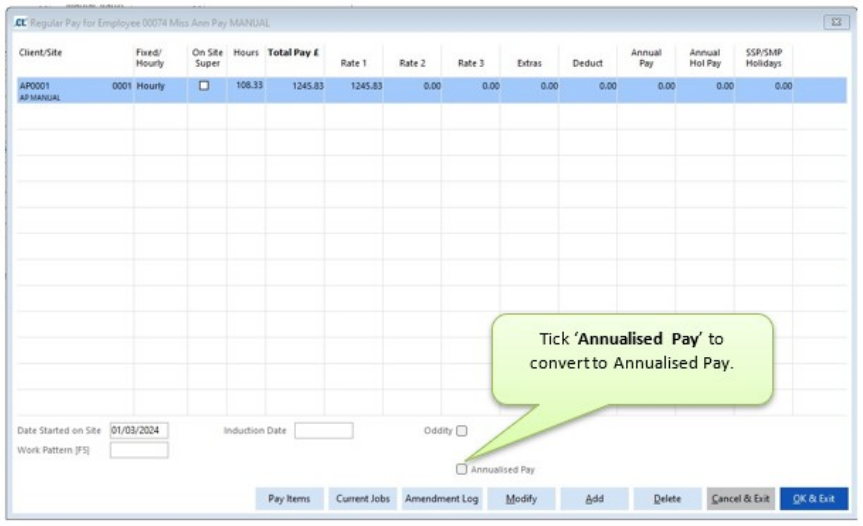
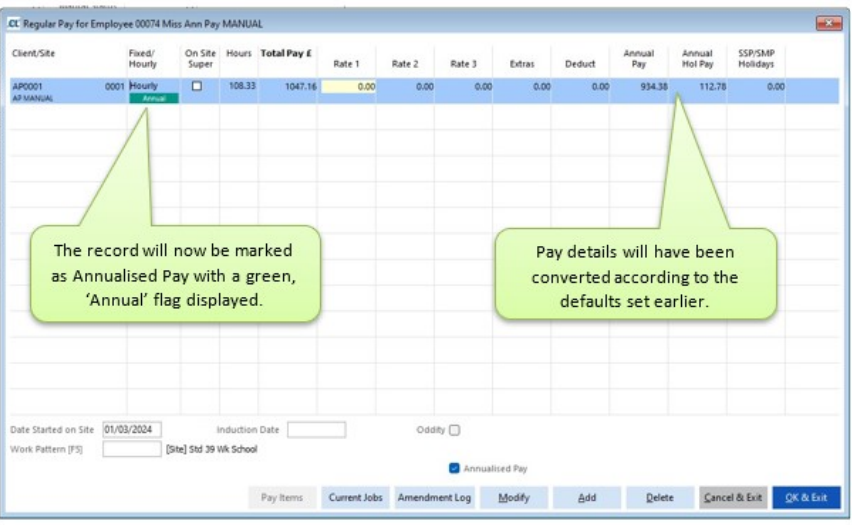
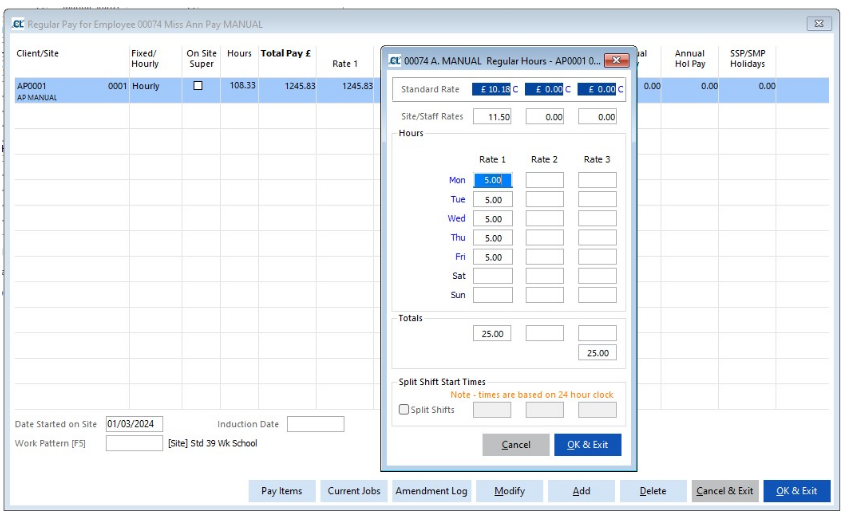
To view or amend the details for this employee, double click in the Rate 1 column to bring up the screen below. The section on the left displays the employee’s regular hours in the same way as for non-annualised staff whilst the right-hand side shows the details behind the calculation for the Annualised Regular Pay and Annualised Holiday Pay elements.
Regular Pay Calculation:
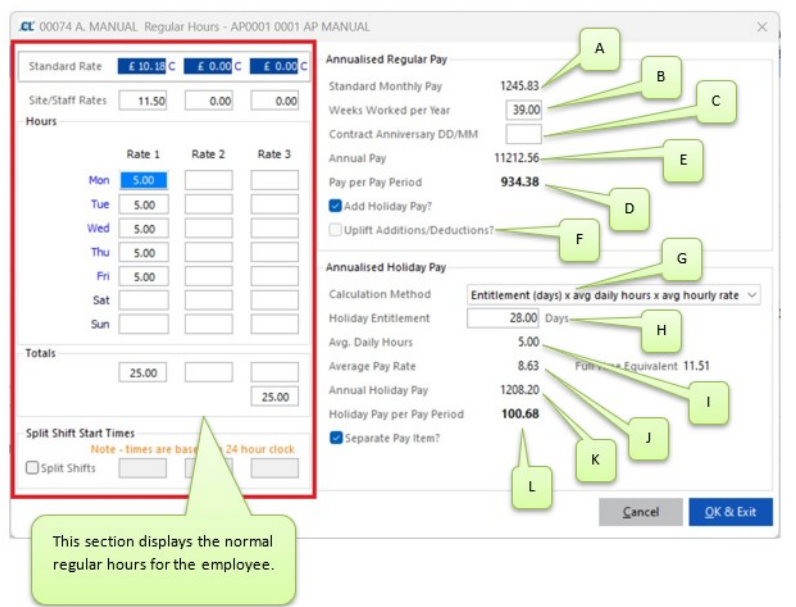
A - The per period pay if the employee was not on annualised pay. In this example 25 hours per week x 4.3333 = 108.3325 (to get the average month) at £11.50 gives £1245.83 for a month.
B - The weeks worked per year for the employee. This will originally be populated according to the defaults set at the pay cycle level but can be amended for the individual employee.
C - Contract Anniversary Date - This is the anniversary date of the employee’s contract. It is used in ‘AP Comparison’ screen within the pay cycle when the employee is marked as a leaver. The in-cycle screen allows users to compare the Ees annualised pay against their potential pay if they have been paid using standard hourly pay (not annualised).
The display will look at pay since the anniversary date or, if left blank, their last 12 months of pay when displaying comparison figures in the pay cycle report. It can be used to determine if the employee who is leaving has been paid more or less by annualised pay than they would have if they had been paid as a standard hourly paid employee. A manual addition or deduction can be made by users in the pay cycle as required for the difference.
(Further details can be found in the ‘Annualised Pay in Cycle’ section of this guide.)
D - The per period basic pay that the employee will receive under annualised pay. In this example 1245.83 x 39/52 gives £934.38 per period.
E - Employee’s basic pay after the annualised pay calculation. In this example £934.38 x 12 monthly periods gives £11212.56.
F - Uplift Additions/Deductions - Annualised Pay additions and deductions which are calculated by the system based on the actual hours vs expected hours, may need to be optionally uplifted to include an element of extra holiday pay. Enabling this setting allows the system to automatically increase/decrease the holiday pay each period to account for working over/under the expected hours. This is an optional setting.
Please Note: 'Uplift Additions & Deductions' must have been enabled in Setups> K. Pay Cycles> Details> 'Annualised Pay' beforehand. Pay Items must also have been allocated to 'Addition Accruals' and 'Deduction Accruals' in the same Pay Cycle setup screen.
Holiday Pay Calculation:
G - Calculation Method: This will populate with the default from the pay cycle configuration and will be used to calculate the holiday pay for this employee on this Site. The calculation method can be amended at this Staff> Jobs level if necessary.
H - The employee’s annual holiday entitlement. This will populate using the defaults from the pay cycle configuration, but can be amended as required on an individual employee job basis. The system will use the entitlement figure to then annualise it based on the figure entered in field B, therefore the entitlement should be entered as if the employee is on a full-time contract.
I - The average daily hours for the employee depending on the calculation method used.
J - Average pay rate after annualisation. In this example £11.50 x 39/52 = 8.625 which is rounded to £8.63
K - Annual Holiday Pay, H x I x J. In this example 28 x 5 x 8.63 = £1208.20
L - Per Period Annualised Holiday Pay, figure K divided by the number of pay periods in the year. In this example £1208.20/12 = £100.68
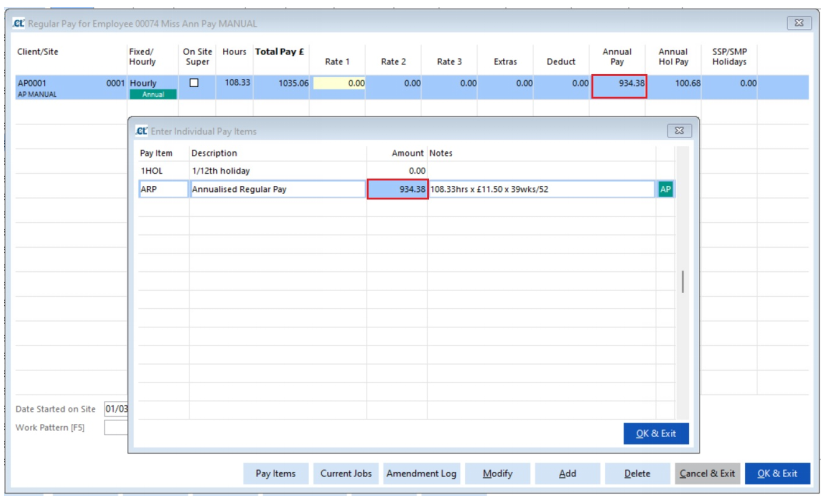
These figures then populate the relevant pay items as set up for this cycle. This can be viewed by clicking on the relevant columns.
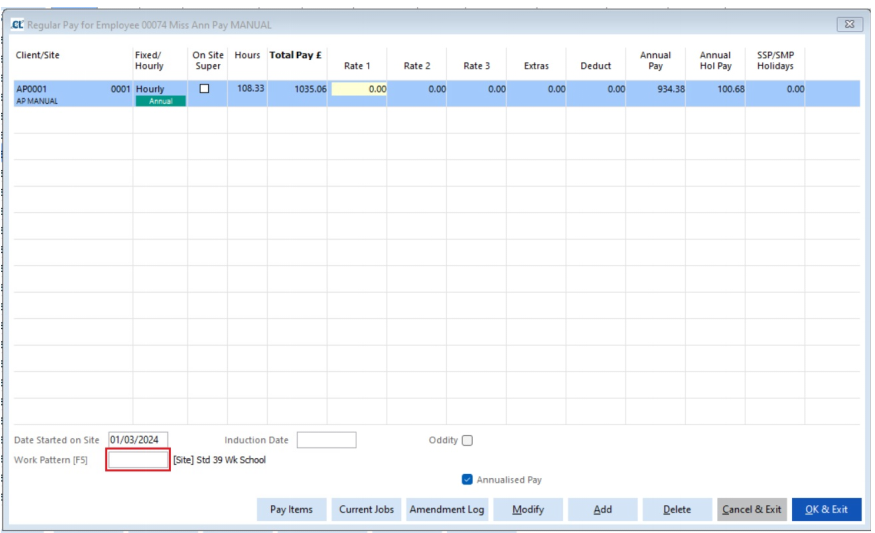
Employee Work Pattern:
If the employee is to use a different work pattern to the site default, then this can be set by double clicking in the ‘Work Pattern’ field in Staff> Jobs (shown below).
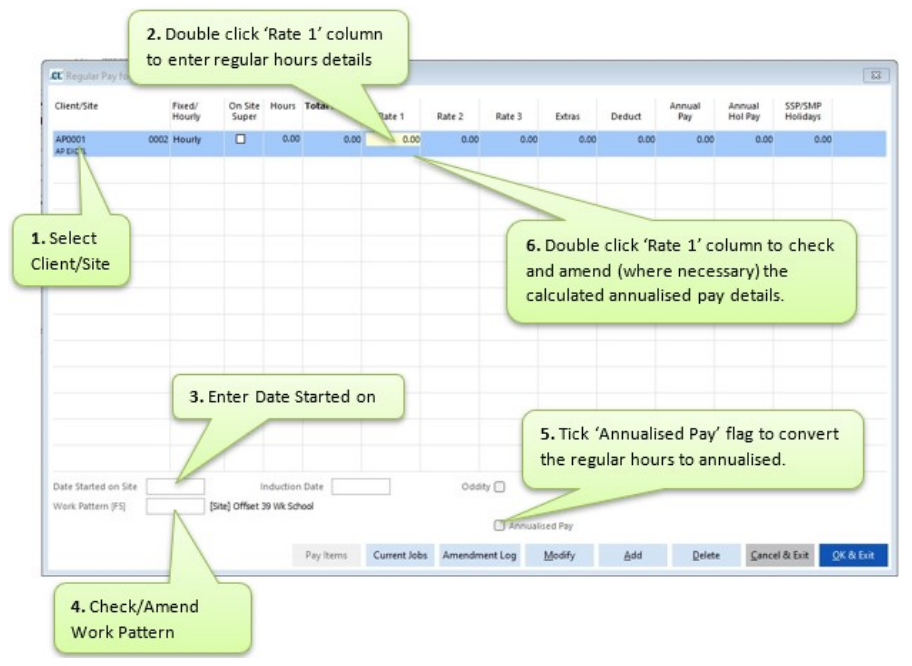
Setting up Job for new Annualised Pay Employee
Go to Staff> A. Staff Maintain> select employee> ‘Jobs’ button
Set up the job in the same way as an hourly paid employee is set up using these steps:
1.Select ‘Client/Site’
2.Double click ‘Rate 1’ field to enter relevant ‘Rate of Pay’ and Hours per day.
3.Enter ‘Date Started on Site’
4.Check correct ‘Work Pattern’ applies to the employee on this Site, amend as necessary by double clicking the ‘Work Pattern’ field
5.Tick ‘Annualised Pay’ flag - this will convert the pay to annualised pay based on the default settings.
6.Double click ‘Rate 1’ field to view the calculated annualised pay settings for this employee on this Site. Please Note: The pay cycle defaults will have been used initially, the user can amend as required for this employee at this Site. (see Regular Pay Calculation above for example of how the annualised pay is calculated).
Regular Pay Import
To reduce the volume of manual input required to set up/convert employees to be paid annualised pay, we have introduced a ‘Regular Pay Import’ function whereby users can populate our Regular Pay Import template and then import it into the system.
This is for use where employees are currently set up with regular pay against hourly paid Sites only. If an employee already has hourly pay at a site, it will be overwritten with the details on the import file. If an employee already has fixed pay at a site the new details in the import file will be rejected.
The template can be found by going to Pay> K. Regular Pay Import> ‘View Template’ button. We would advise reviewing the information needed to populate the template initially and if users have any questions about completing the template, please contact the support team for advice.
When the template has been populated users can check the file for errors by using the ‘Check File’ option within Pay> K. Regular Pay Import> ‘Check File’ button. Errors will be highlighted, and once all errors have been corrected the file can be imported to overwrite the existing regular pay information.
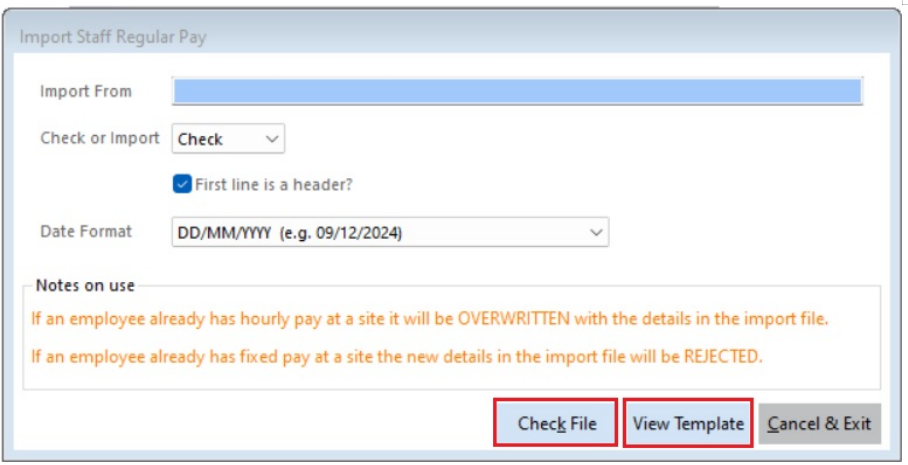
We would strongly recommend users take a backup of their data prior to importing any regular pay import file. Please seek advice from the support team prior to importing if required.
Bulk Removal of Regular Pay Items
New functionality has been developed to assist with the removal of certain pay items from Regular Pay en masse. This new process will allow users who, prior to the release of annualised pay, have specific pay items in use for paying employees annualised pay.
The new function will allow users to select a single pay item to be removed from multiple employees. Filters can be applied to narrow down the range of employees, along with a ‘Preview’ action to see who will be affected prior to making the change.
We would advise users to exercise caution when using this function as the removal of pay items is immediate and cannot be undone. We would recommend users to contact the support team for further advice on using this procedure.
Absence Type Settings for Annualised Pay
An additional setting has been introduced to allow users to choose whether a particular absence type should remove hours from expected regular hours in the pay cycle when the absence is logged. Setting whether an absence type should remove hours from expected regular hours will determine whether an adjustment is made within the pay cycle when absent from work.
Setting an absence type to remove expected regular hours would mean the employee is not penalised for being absent on this day and no adjustment would be made to the annualised pay for this absence.
Entering absence for an employee when the expected regular hours are not removed, would result in a deduction being calculated by the system for being absent on a working day.
The default settings can be set by going to Setups> R. PAYE, NI & Staff Setups> P. Absence Types.
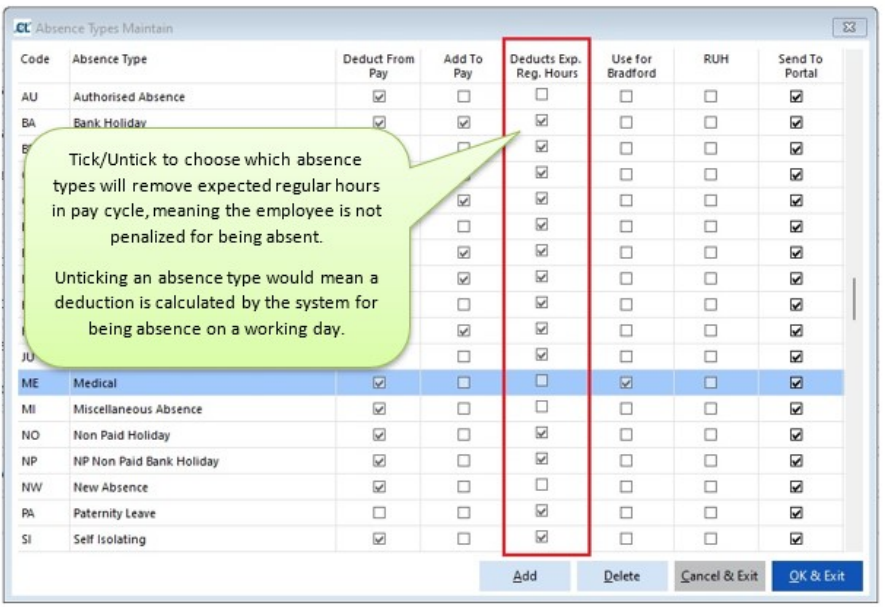
The above settings will be used for any annualised pay employee when absence is logged within the system. If, for example, an absence type is set to remove expected regular hours as a standard, but there is a situation where the expected regular hours should not be removed, the user can manually enter the expected regular hours for this day/(s) within the pay cycle. See ‘Pay Cycle Processing’ section of this guide for further details on how to do this.
Please Note: Further development to allow more flexible absence type settings for annualised pay are due in a future release.
Creating Timesheets for Annualised Pay
The process for creating regular timesheets has not changed, therefore, timesheets can be created in the usual way by going to Pay> B. Regular Timesheets.
Employees who have been set up with jobs flagged as Annualised Pay will be included on timesheets along with their regular hours. The system will refer to the Work Pattern in use for each employee (either found at Site level or at Staff> Jobs level) and only populate hours on the timesheet for days the employee is expected to be at work during the selected period. This is relevant for Printed, Excel, Mobile and Portal timesheet output formats.
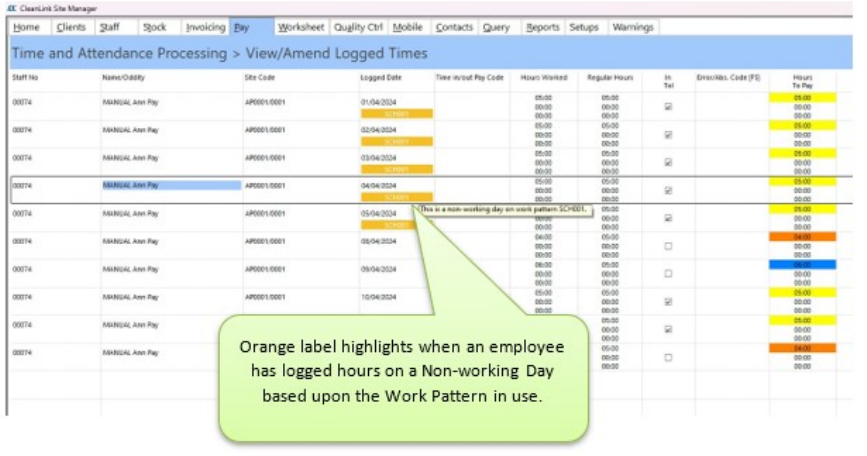
Time & Attendance
For those using a Time and Attendance system minor changes have been made to the Time and Attendance processing screen to allow users to see if hours have been logged on non-working days, based on the Work Pattern in use for the employee on the Site. This flag will not prevent the hours from being imported into the cycle, therefore if the logged hours are incorrect and shouldn’t be imported, the record will need to be marked as ‘Ignore Record’
With the introduction of Work Patterns, the system has been designed to automatically calculate an addition or deduction within the pay cycle for annualised pay employees when they have worked more or fewer hours than expected. This concept has been designed to work with all types of payroll processing method, including manual adjustments made to regular pay in the pay cycle, as well as imports from Excel timesheets, any of our current Time & Attendance import offerings, and our CL Mobile and CL Portal timesheets.
Regular Pay when Opening Pay Cycle
No changes have been made to the way in which regular pay details are pulled into the pay cycle. Sites that are not set with a T&A Reference No. will continue to pull regular hours into the pay cycle for all employees with a regular job, including annualised pay employees. For those set as annualised pay, their Annualised Pay amount, and (where applicable) Annualised Holiday Pay amount for the period will pull into the pay cycle also.
Where Sites are set with a T&A Reference No. and worked hours will be imported from one of the various import options available, when the pay cycle is opened, the system will not pull through hours for employees, including annualised pay employees, however, for those set as annualised pay, their Annualised Pay amount and (where applicable) Annualised Holiday Pay amount for the period will pull into the pay cycle.
Annualised Pay within Pay Cycle
When opening the pay cycle, the system will check for any employee with a Work Pattern set within their job (either found at Site level or at Staff> Jobs level) and will reference this when pulling data into the pay cycle.
The system will pull through the relevant Annualised Pay amount and (where applicable) Annualised Holiday Pay amount for the period, and show an adjustment where the Actual Hours are different to the Expected Regular Hours.
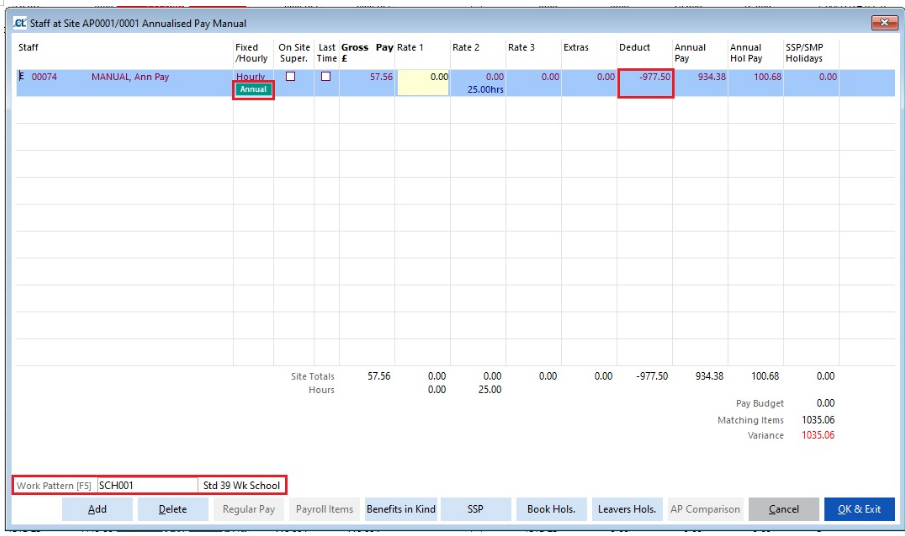
Employees set to use Annualised Pay on a Site will display the green ‘Annual’ flag within the pay cycle. To view the pay details for this pay period, single click on the green ‘Annual’ flag, outlined in the below screenshot.
The Work Pattern in use for the employee will be visible within the pay cycle. Outlined in the below screenshot.
Please Note: If hours are due to be imported from an external source (Excel T/S, T&A Provider etc) a large deduction value will be visible when first opening the cycle, as the expected regular hours will have been populated at the point of opening the cycle, but no actual hours will have been imported at this time (outlined below). As hours are imported into the pay cycle the addition/deduction value will update automatically.
Annualised Pay and (where applicable) Annualised Holiday Pay values can be viewed by double clicking in the column within which the pay item being used for each has been set up.
Examples below for both Annualised Pay and Annualised Holiday Pay when paying each against a different pay item.
Annualised Regular Pay in Cycle

Annualised Holiday Pay in Cycle
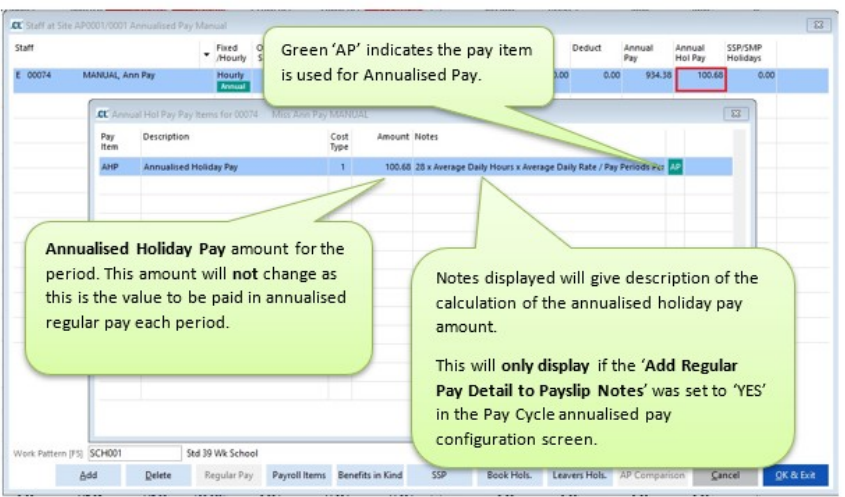
Please Note: If Annualised Holiday Pay is not being paid against a separate pay item, the Annualised Pay and Annualised Holiday Pay value will show against the single chosen annualised pay, pay item.
Any employee set as Annualised Pay will now have two tabs within the pay cycle when viewing their record via A. Site Summary> select Site> ‘Staff at Site’> Double-click Rate 1 column or B. Pay By Staff> choose Employee> press ‘Select’> Double-click Rate 1 column.
One tab for ‘Actual Worked Hours’, and one tab for ‘Expected Regular Hours’.
Actual Worked Hours tab
This tab will show the actual hours worked by the employee; either pulled into the cycle from regular pay and then with manual adjustments made to the hours, or populated when an import from an external source (Excel T/S, T&S Provider etc) is carried out into the pay cycle. (For those with hours being imported into the cycle, this will be blank when first opening the pay cycle)
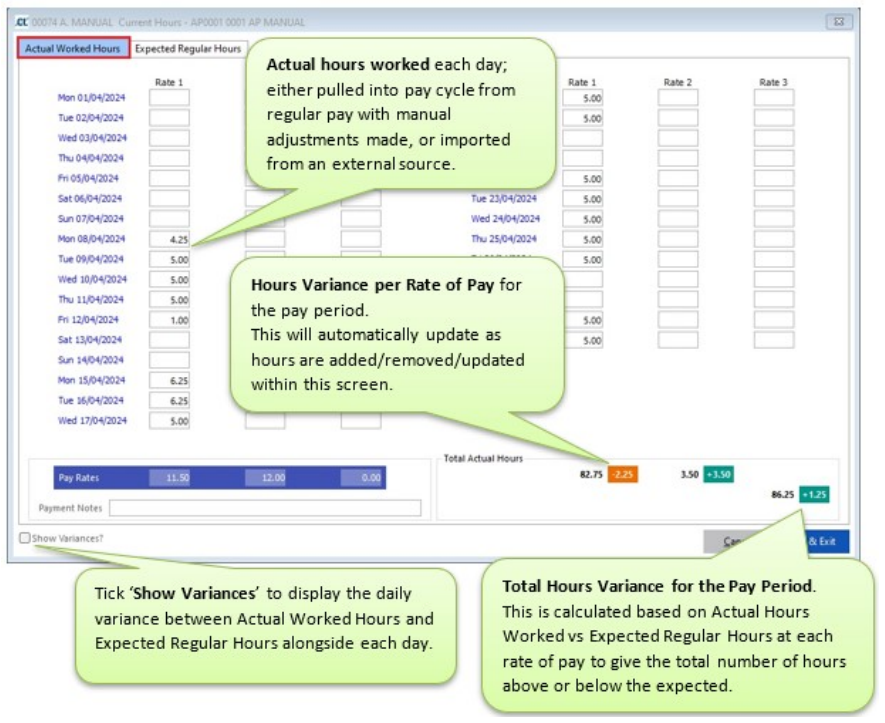
The Actual Worked Hours tab is where amendments should be made for the hours worked each day, as amendments are made the variance will automatically re-calculate.
The functionality within the Actual Worked Hours screen is the same as any standard hourly pay employee’s worked hours screen, meaning rates of pay can be amended if required and absences entered by double clicking on the relevant day like normal.
Please Note: When absences are entered, the system will use the Absence Type settings from Setups> R. PAYE, NI & Staff Setups> P. Absence Types to determine whether to remove the expected regular hours or not, this setting will be used to decide if the employee should be penalised for being absent on a particular day.
If there is a situation where the Expected Regular Hours are removed for an employee when entering absence and you do not want them to be, or they are not removed and they should be, simply add/remove the expected hours manually via the Expected Regular Hours tab to suit the situation.
Expected Regular Hours tab
This tab will show the expected regular hours for the period based upon the Work Pattern in use for this employee on this Site.
Days which are populated with hours are working days where the employee is expected to be at work. Days that are not populated with hours are non-working days when the employee is not expected to be at work.
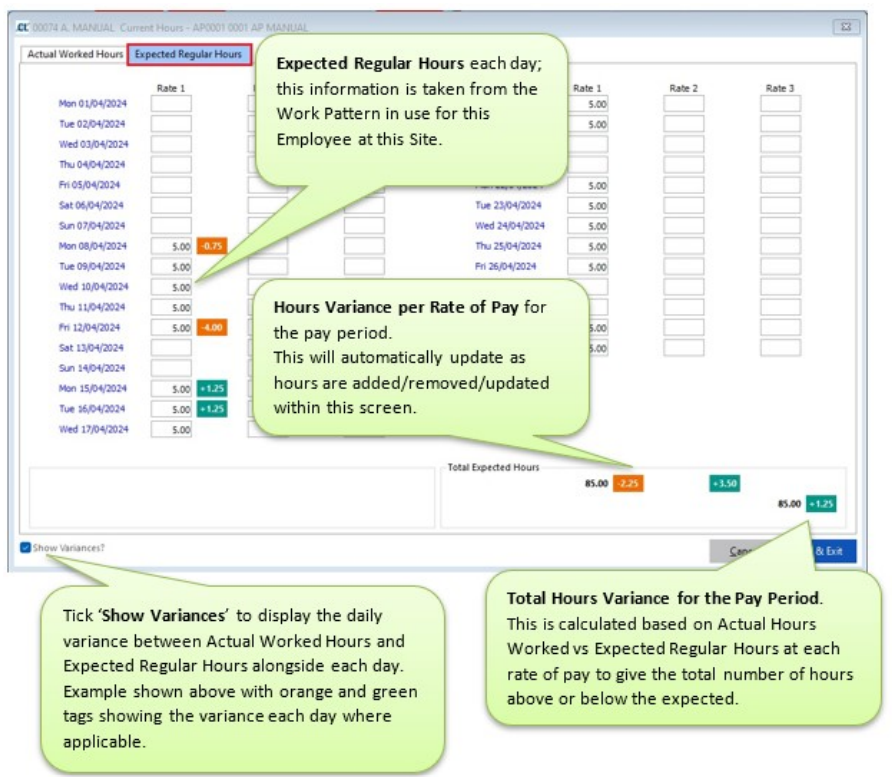
The system uses the comparison of Actual Worked Hours vs Expected Regular Hours to calculate the total variance for the pay period.
When an employee has worked more hours than expected an ‘Addition’ is calculated by the system and will be shown against the pay item selected during the setup of annualised pay.
When an employee has worked fewer hours than expected a ‘Deduction’ is calculated by the system and will be shown against the pay item selected during the setup of annualised pay.
Example of Employee who has worked more hours than expected in the period:
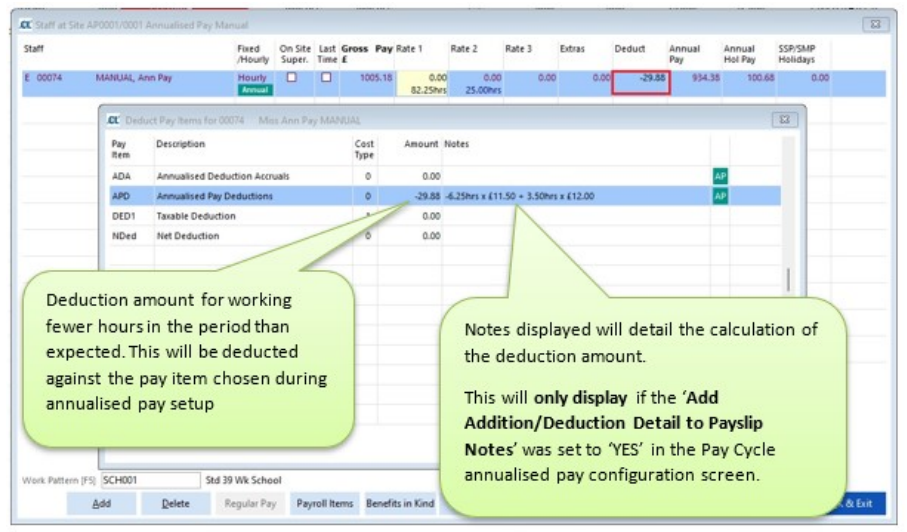
Please Note:
If ‘Add Regular Pay Detail to Payslip Notes’ and ‘Add Addition/Deduction Detail to Payslip Notes’ were set to ‘YES’ in the Pay Cycle annualised pay configuration screen, these notes will appear on payslips when produced. These settings can be amended by going to Setups> K. Payroll Cycles> Select the relevant cycle> press ‘Details’> press ‘Annualised Pay’ button.
Optional Uplift of Additions and Deductions
When setting up annualised pay, if you chose to ‘Uplift Additions and Deductions’ annualised pay additions and deductions which are calculated by the system based on the actual hours vs expected hours will be uplifted to include an element of extra holiday pay.
This addition or deduction for the uplift will be calculated by the system and displayed against the relevant pay item within the pay cycle. This is an optional setting and may not be activated if not in use within your organisation.
Annualised Pay Employee Leaving within Pay Cycle
The process for marking an employee as leaving within the pay cycle has not changed and can be processed in the usual way, this includes for annualised pay employees.
When an annualised pay employee is marked as a leaver an additional screen will be made available to allow users to compare the Employee’s annualised pay against their potential pay if they have been paid using standard hourly pay (not annualised).
The system uses the Contract Anniversary Date (found in Staff> Jobs> Annualised Pay calculation details screen) to compare the relevant periods. The system will look at the employee’s pay since the anniversary date or, if left blank, their last 12 months of pay when displaying comparison figures in the ‘AP Comparison’ screen.
The comparison allows users to determine if the employee who is leaving has been paid more or less in annualised pay than they would have if they had been paid as a standard hourly paid employee working 52 weeks per year.
The AP Comparison screen can be accessed after the last time flag and leave date have been entered in the pay cycle either via
A. Site Summary> select Site> ‘Staff at Site’> ‘AP Comparison’ button or
B. Pay By Staff> choose Employee> press ‘Select’> ‘AP Comparison’ button.
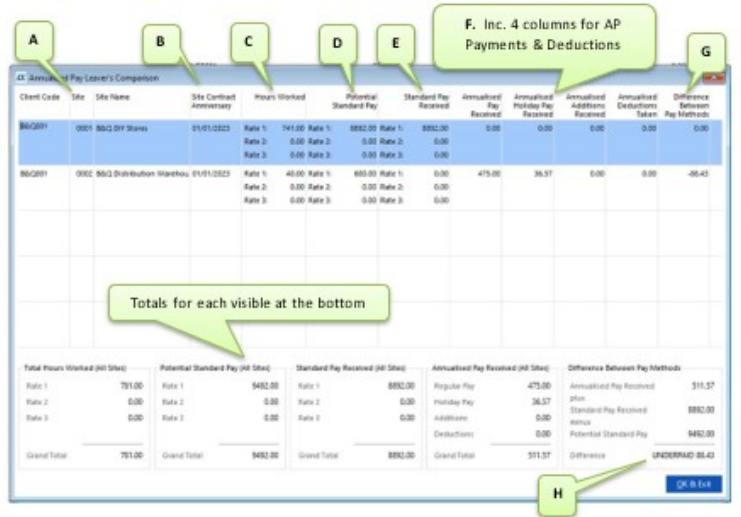
A.The Client Ref, Site No. and Site Name.
B.The last Contract Anniversary Date, this date field can be by going to Staff> Jobs> Annualised Pay calculation details screen. Only pay on or after this date will be included. If no Contract Anniversary date is set then all pay within the 12-month window will be included (this is known as the ‘Relevant Period’).
Please Note: After entering or amending the Contract Anniversary Date in the Staff Job, the report can be generated again to report on the new relevant period.
C.The Hours Worked in the relevant period at each of the three pay rates.
D.The ‘Potential Standard Pay’ at each of the three pay rates, which is the sum of Hours x Pay Rate for each pay period in the relevant pay period.
E.Any ‘Standard Pay Received’ in the relevant period (in the case where someone switches to annualised pay mid-way through the relevant period).
F.Any ‘Annualised Pay Received’ in the relevant period (this includes normal annualised pay, holiday pay, additions & deductions (these will include addition and deduction uplifts, where applicable)
G.The Difference Between the Pay Received (standard plus annualised) and the Potential Standard Pay. i.e. pay received minus potential pay. Negative values mean the employee would have been better off under standard pay in the relevant period (and might be due extra pay upon leaving), positive values mean they have earned more while on annualised pay in the relevant period (and might owe the employer some money).
H.The screen should also show grand totals for the above, where the final difference figure will be the suggested pay adjustment.
Managing the Difference
If, after comparing the figures in the AP Comparison screen, you wish to make an amendment for the difference, either positive or negative, this will need to be made manually against a pay item of your choice. The system will not automatically pay/deduct for the difference.
Calculating the Pay Cycle
The process for calculating the pay cycle and running reports etc has not changed. As usual, when all adjustments have been made to employees in the pay cycle, regardless of whether they are standard hourly paid employees or annualised pay employees, please calculate as normal and complete the usual checks.
Please Note: Where employees have worked very few actual hours compared to their expected hours, it is possible that they will be calculated with a negative total which would cause an error when calculating. It will be up to the user to decide how to manage these circumstances.
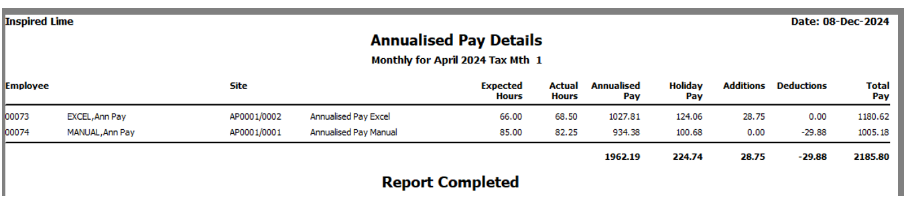
Annualised Pay Report in Pay Cycle
A new report has been introduced to allow users to view the annualised pay details for employees within the pay cycle. This report can be run within the pay cycle by going to H. Reports> AC Annualised Pay. There are a range of filters available to select and as usual the report can be output in CSV or PDF if required.
Example of Report: