Processing Pay Cycle |
  
|
Processing Pay Cycle |
|
Set out below is an outline of the process to work through for running a payroll cycle, be it weekly, monthly or a variation of the two. This outline is simply a guide, there are alternative options that can be explored/adopted if you feel they better suite your requirements.
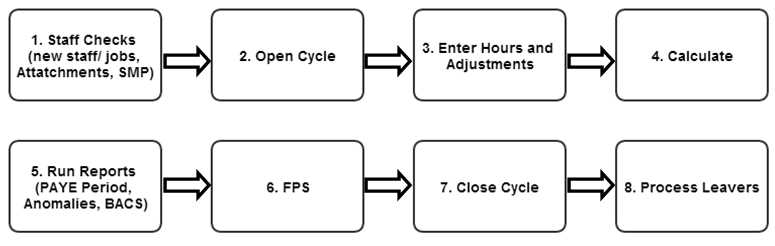
Payroll Cycle Process Flow
Before opening the pay cycle it is important to complete as many staff checks as possible. This includes the adding of new starters, entering Maternity details and new Attachments. The more of this information you can enter at this point, the easier it should be when making any amendments from Paysheets.
The key points to cover are:
•Ensure any leavers from the previous period have had their status changed to Left, a leaving date entered and a P45 printed. This will stop any unnecessary staff/jobs being brought into the pay cycle.
•Enter all new staff and attach to the sites with pay rates and regular hours. Refer to the ‘Adding Staff’ and ‘Assigning Staff to Sites’ sections of this help file for further information.
•Set up any new Maternity Pay records for any staff. Refer to the ‘Maternity Payments’ section for further information.
•Enter any SSP to staff where appropriate (this can also be entered once the pay cycle has been opened)
•Set up any new attachment of earnings orders for staff. Refer to the ‘Attachments’ section for further information.
•Check any staff reaching 25 years of age during the cycle are to be paid in accordance with the Living Wage.
When the pay cycle is opened it will look at the staff files & Jobs/Pay Regular and import the relevant information from these templates into the period for the cycle. This is why it is important to have as much information entered as possible at step 1 above. The more that can be imported at this stage, the fewer amendments should need to be done in the cycle.
To open the required cycle go to: Pay> Pay Cycle> Select Next Pay Cycle Marked ‘Required’
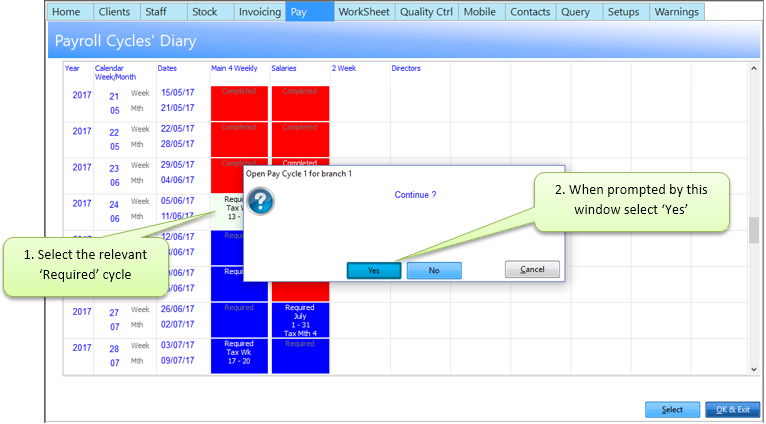
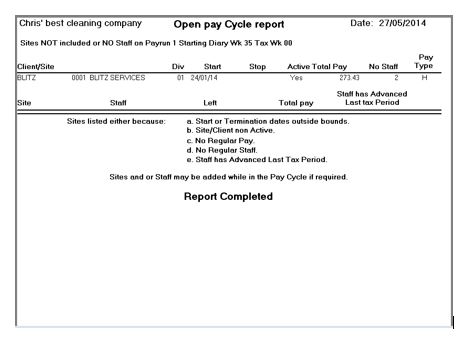
The system will now check the Staff and Pay Regular details and use them to ‘Create Current Pay Records’. The following Open Pay Cycle Report will be displayed. This shows any sites or staff that have not been included in the cycle but have regular pay set. The following shows a site that is set to start in a future pay cycle.
3. Enter Hours and Adjustments from Paysheets
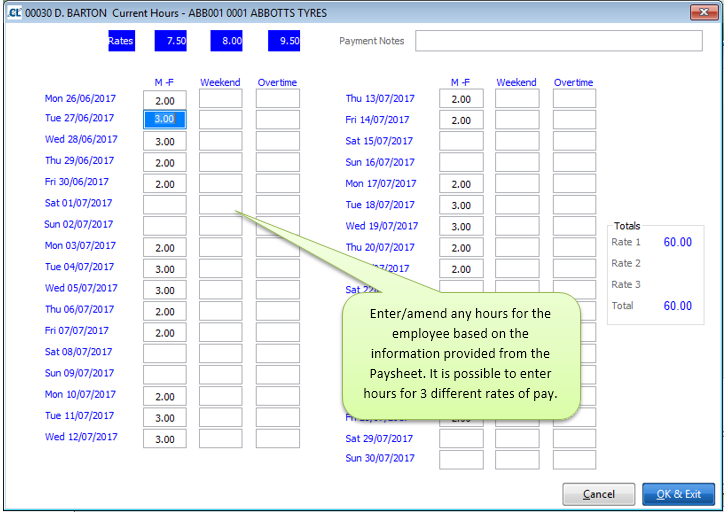
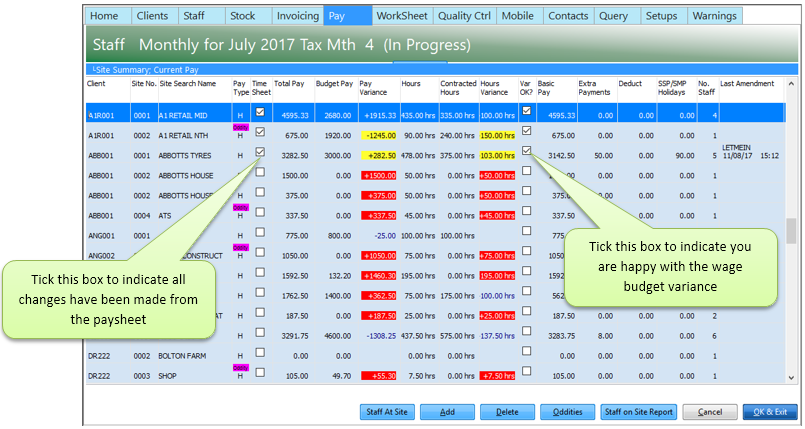
Once the pay cycle has been opened use 'Site Summary' option to enter details of pay, add or delete sites or staff as required and amend hours worked. This is the section best designed for the entering/amending of hours from Site Paysheets.
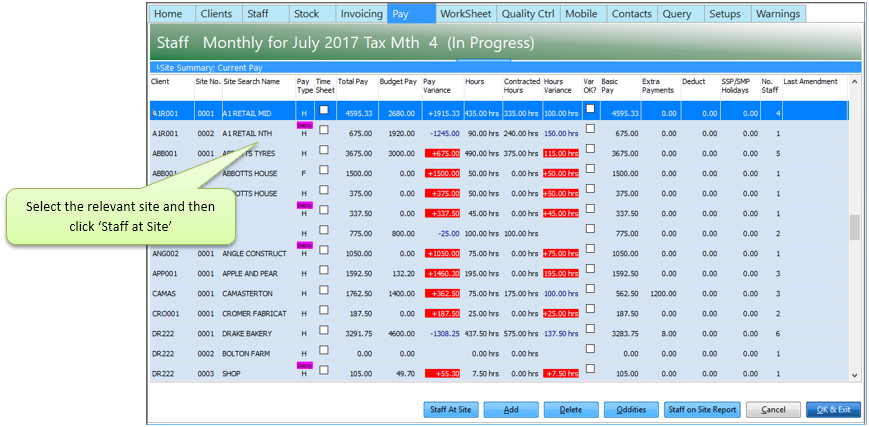
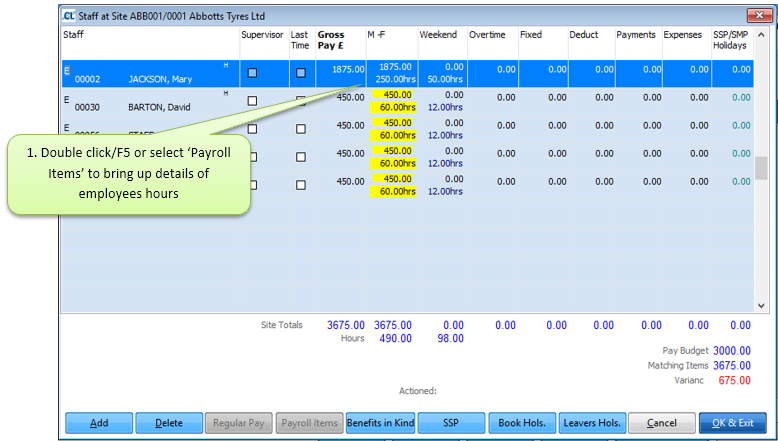
The screen shot below shows the details of the staff due to be paid on a site. Use this screen to make necessary amendments from the Paysheet.
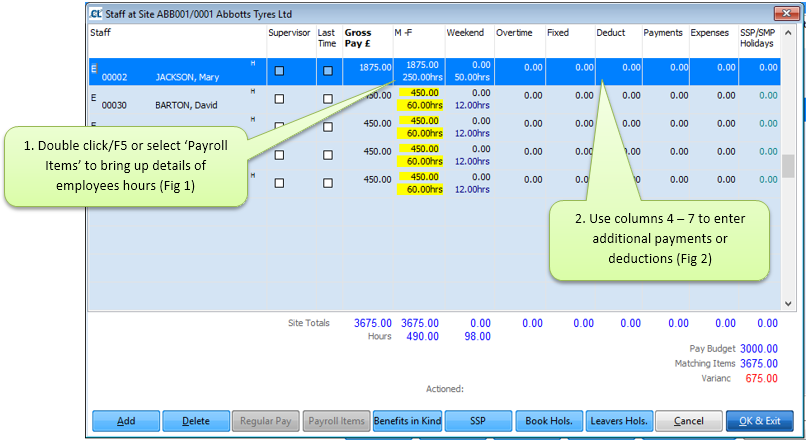
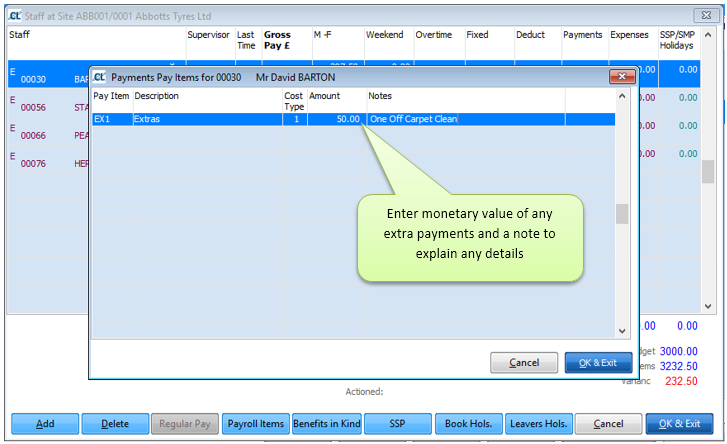
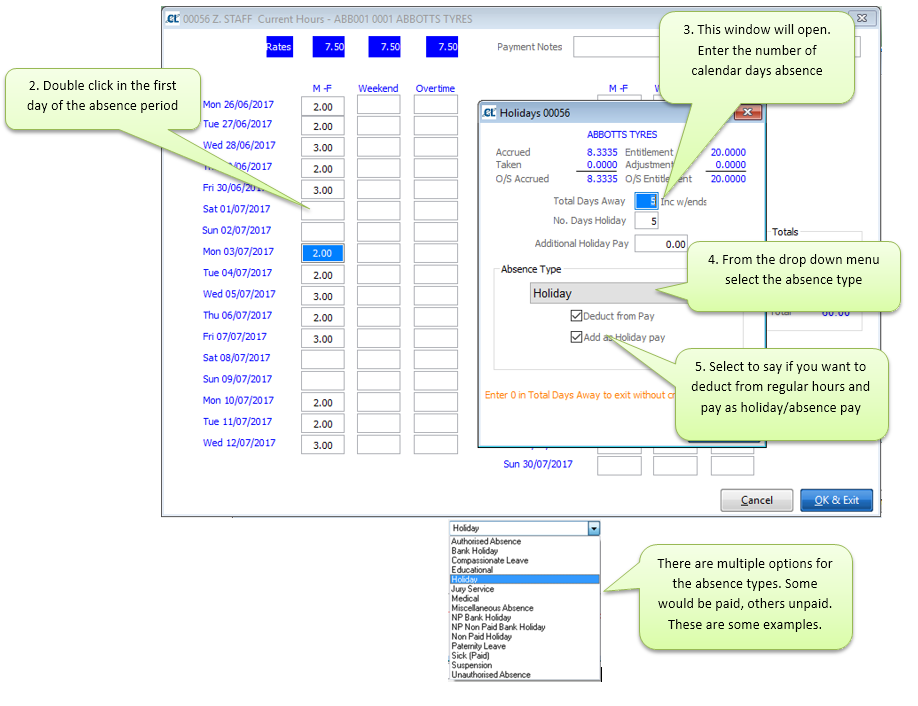
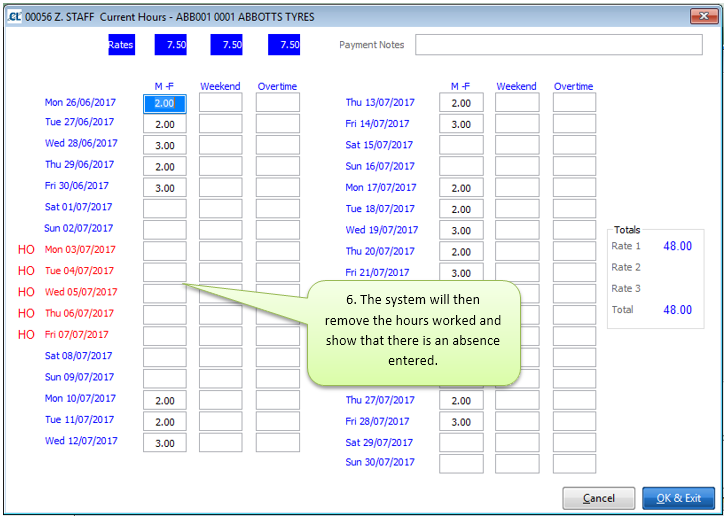
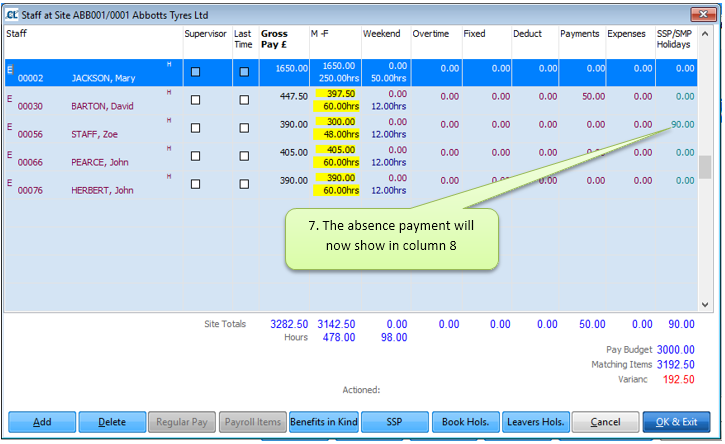
From the Staff at Site screen it is also possible to make payments for absences, be it SSP, authorised absence or holidays. Below are some details:
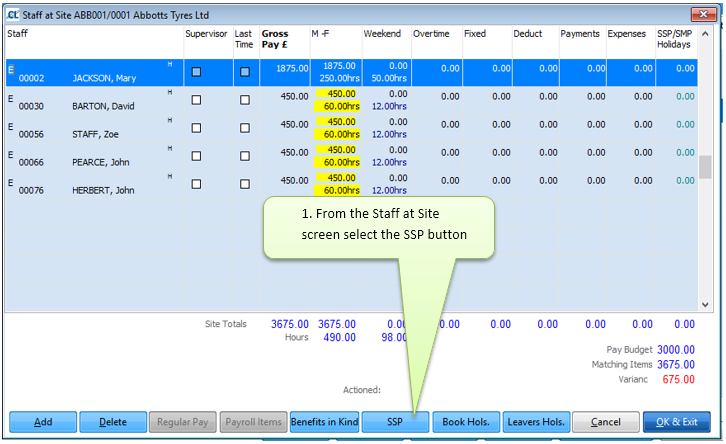
The following screen will appear (Same display as the SSP tab from the Staff Record.)

Holidays, Authorised Absence etc
Once you have made all adjustments from the site Paysheet tick off timesheets as they are completed and investigate and approve any budget variances. This will give you a visual check so that you know all sites have been completed.
Once you have made all amendments from the Paysheets and investigated any pay budget variances you are at the point to 'Calculate' the payroll.
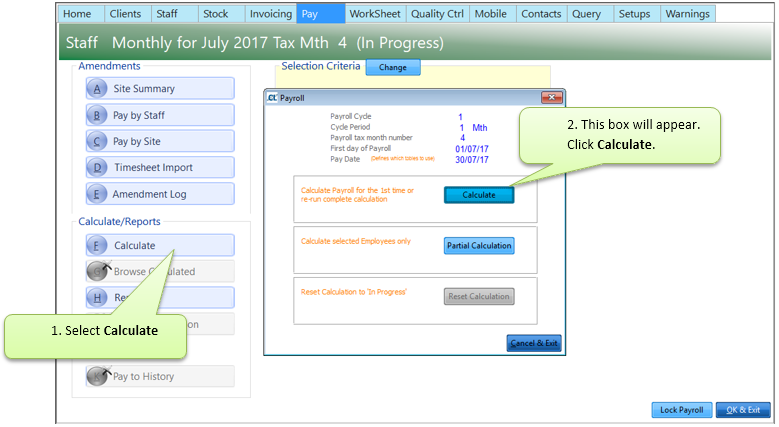
Calculating the payroll is the point at which the system will ‘Calculate’ employees Tax, National Insurance, SSP, SMP, Attachment deductions and Pension deductions. From this point you can review your employee pay figures before printing reports, payslips, processing BACS and RTI transmissions. The ‘Calculate’ can be reset and ‘Re-calculated’ as many times as you need.
To calculate for the first time go to:
Pay> Pay Cycles> Select required Cycle> 6.Calculate> Calculate
Once the calculation process has completed, the system will automatically produce the:
•Pay Anomalies Report – Lists all staff with anomalies such as Holiday Pay, SSP, SMP, and higher or lower than normal pay figures.
•Staff Not Paid Report – Lists any staff who have regular hours set for this cycle but have not been paid this period
•Pay Code Analysis – Gives the total amounts paid for each pay code. Also gives details of numbers of full and part time staff
•Staff Check Report – Lists any anomalies with staff records such as invalid tax codes, NI codes, Date of Birth etc. These will usually need amending before sending RTI transmissions.
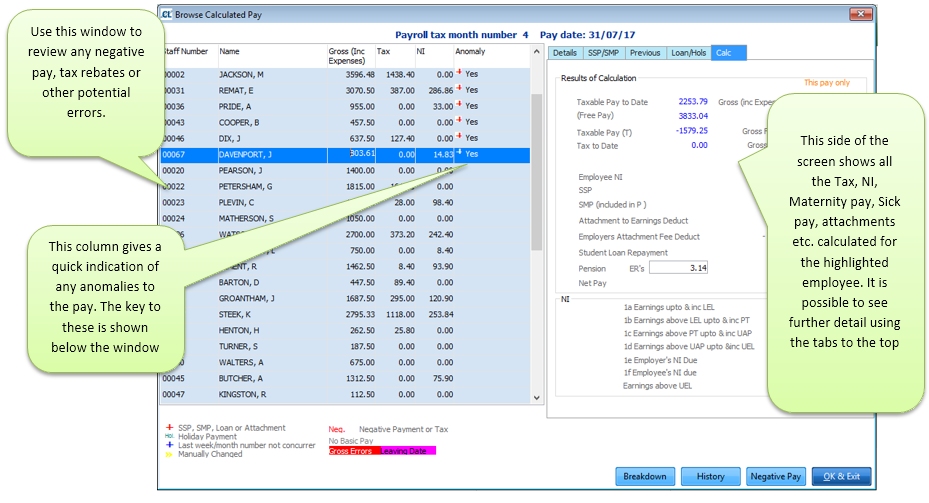
After you have analysed these reports the next screen to appear is the Browse Calculated Pay. This gives you an overview of gross to net payments for all staff. Use this to check for any negative pay or other potential errors.
If you have any queries following this screen it is possible to go back into the ‘Site Summary’ screen used for entering the hours and view what hours, absence etc were paid to the staff. At this point it is possible to view only, it is not possible to make any further amendments in this screen. If you discover a problem that needs amending, you will need to ‘Reset’ the calculation. To do this go to:
Pay> Pay Cycles> Select required Cycle> 6.Calculate> Reset Calculation
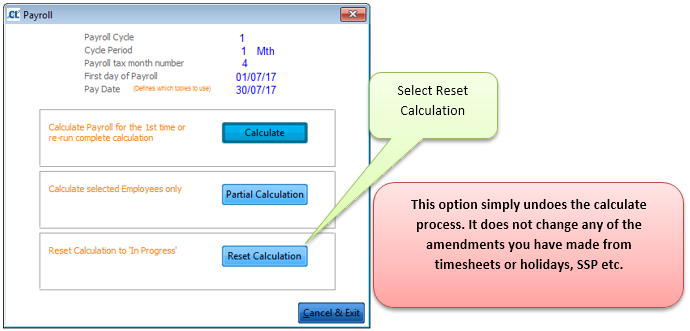
Now it is possible to go back into the ‘Site Summary’ screen and make any amendments required.
Once you are happy all wage amendments are correct you can 'Calculate' for the final time by going to:
Pay>Pay Cycles>Select required Cycle>6.Calculate>Calculate
Review the browse calculated pay again and if all looks correct there you are ready to run your reports, process BACS and send RTI transmissions.
You are now at the stage to be able to run off your required reports relating to the pay cycle. To run the reports select ‘8.Reports’ from within the pay cycle.
There are a large range of reports available for the pay cycle. The most frequently used ones are listed on the left hand side of the screen. These are:
1.Paysheets – The timesheets for the pay cycle.
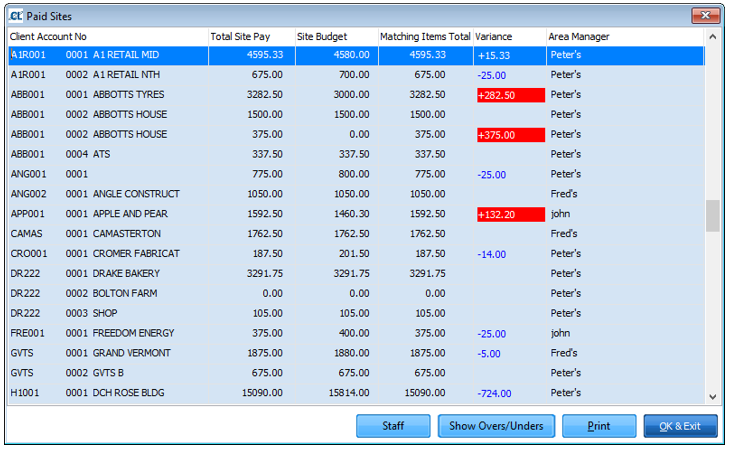
2. Pay Budget Variance – This shows a list of all sites that are over or under their wage budget. You can view the staff that were paid on the site and produce a report from the screen.
3. Anomalies and Summary – The same report that is produced when you ‘Calculate’ the payroll
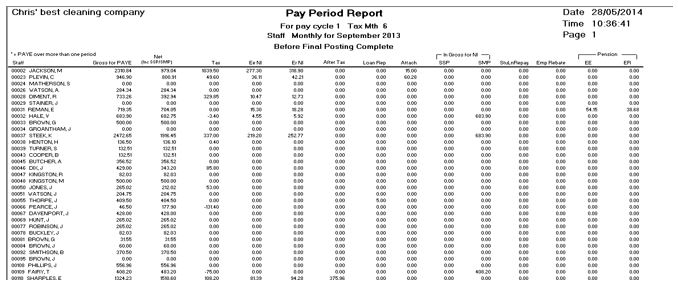
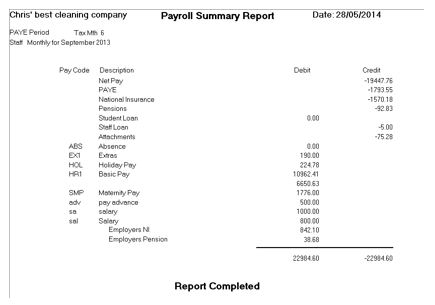
4. PAYE Period Report – This report shows all staff and the breakdown of their wages from gross to net. It is a very helpful report to review their pay and analyse the breakdown of the pay. There is an advanced option which allows further detail including the subtotals for each Department.
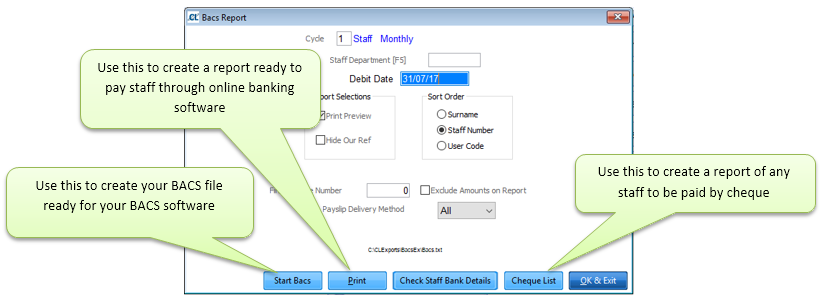
5. BACS and Cheques – Use this to create your BACS file to import into your BACS software. At this point Cleanlink will create the RTI FPS file ready to be transmitted to HMRC. You will have the option to transmit this now or through the RTI Transfer later. Through the BACS and Cheques you are also able to produce a printed BACS report to use if paying wages through online banking, or a Cheque list for any staff paid through this method.
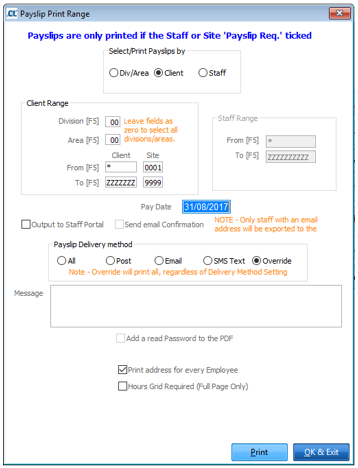
6. Payslips – This gives you the option to print payslips or send via email, SMS or upload to the Portal. If you were to select ‘Email’ the system will email all payslips to all staff who have that option selected, it will then print the remainder ready to be posted out.
7. Posting Breakdown – This gives a summary of all payments and deductions for the pay cycle and can be used to post these figures to your accounts software.
8. P32 Report – this report is only available once you have closed the pay cycle by using the ‘Pay to History’
9. Post to Nominal – This creates a CSV file that can be imported into your accounts software such as Sage or OPERA
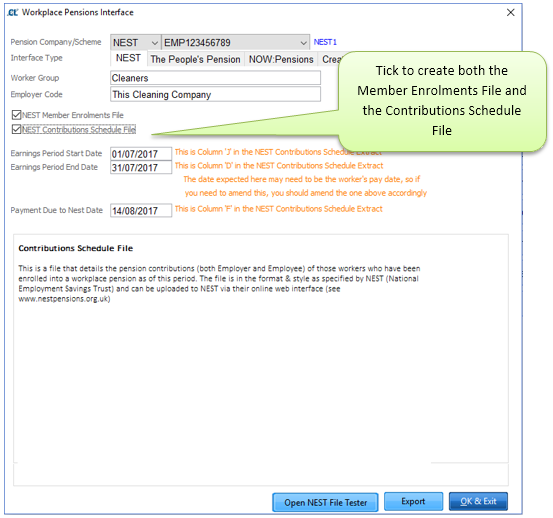
10. Workplace Pensions Exports – This is used to create the export files that you then upload to NEST or The Peoples Pension. For further information on Workplace Pension processing please refer to the CleanLink Site Manager Workplace Pensions help file.
11. Workplace Pensions Reports – This produces a report that lists all staff where their ‘Worker Status’ has changed within the current pay period.
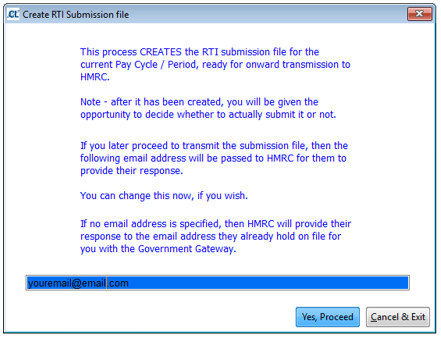
6. FPS (Full Payment Submission)
This is the point at which you send your FPS (Full Payment Transmission) via RTI to HMRC. This must have been sent to allow you to close the pay cycle. An FPS can be sent more than once, if you have re-calculated a payroll after you have sent an FPS you will have to send another before you can close the pay cycle. The FPS should be sent through to the HMRC before the staff receive their Pay. If this is not done you will get a prompt to state why the transmission is late.
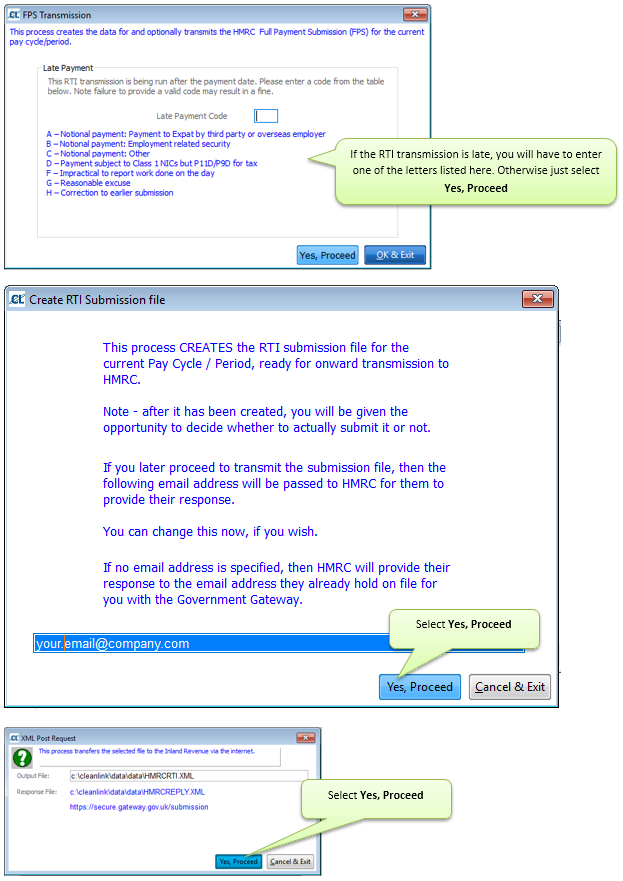
The system will then go through the process of sending the FPS through to HMRC and should display a successful transmission message. You will then get an email confirmation from HMRC.
Occasionally your FPS submission may be unsuccessful for a number of reasons. You can get a simplified breakdown of the entries that cause the error by going to Pay > C. In Year Movements > I. HMRC Submission History and following the steps below.
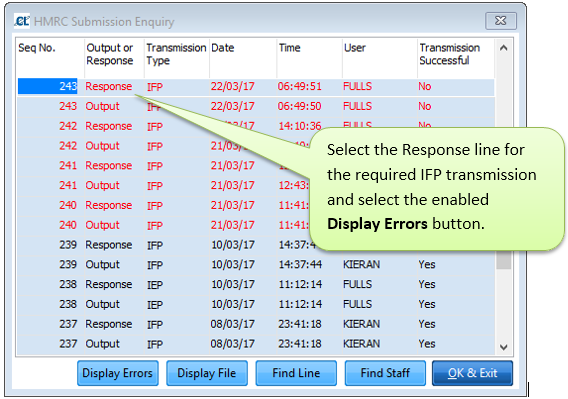
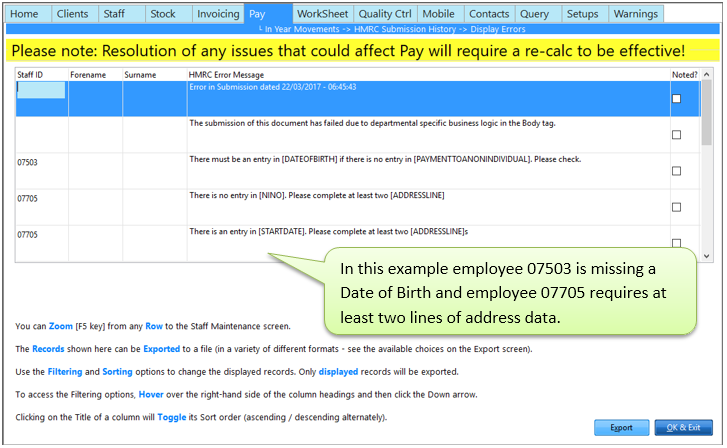
You can jump to the relevant employee by highlighting a row and pressing F5 or you can export the displayed data in a variety of formats by clicking Export. Once you have made the necessary amendments you will need to resubmit your FPS. Please note that some errors, such as those requiring Tax Code changes, will require the cycle to be re-calculated in order to take effect in the current cycle.
If you require any further information relating to RTI processing please refer to our ‘CleanLink Site Manager RTI User Guide’ for comprehensive instructions.
Now that all amendments have been made, you are happy the pay figures are correct and you have sent the FPS, you are ready to close the pay cycle and ‘Pay to History’.
This is the point of no return! Once you have ‘Post to History’ it will not be possible to make any further amendments. It will however still be possible to run any reports or exports.
At this stage we would advise to take a backup of CleanLink before closing the cycle. To do this use the ‘Right Click Menu’ and select ‘Main Menu’. From here you will have the ‘Backup’ option at the bottom right of the screen.
Once you have completed your backup, from within the Pay Cycle select ‘10.Pay to History’. You will then get the following message:
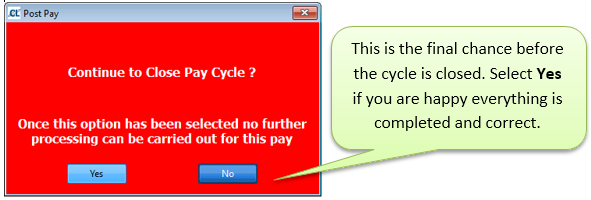
The system will now close the cycle and at the same time complete the following:
•Create the History File
•Update P32 Data
•Remove any staff marked as ‘Last Time’ from the regular pay
•Update the Calendar
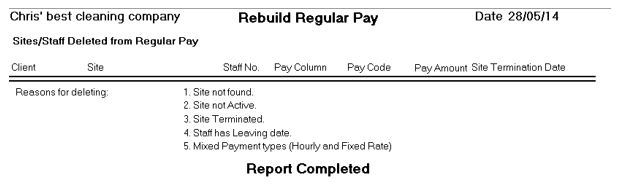
•Rebuild the Regular Pay
There will then be a report created titled ‘Rebuild Regular Pay’. This report will list any Staff or Sites that have been deleted from the regular pay and the reason why.
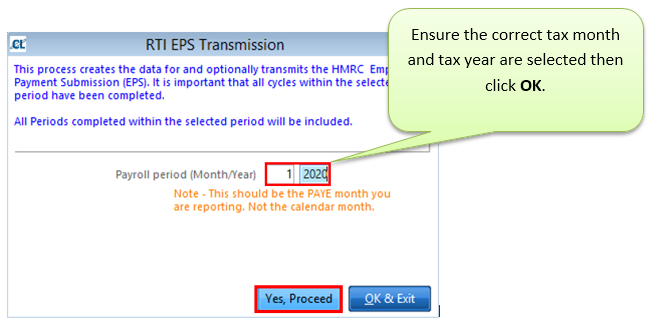
If there have been any payments such as SMP made you will also need to send an Employer Payment Submission (EPS) to HMRC. This should be done after all cycles with pay dates in the relevant tax month have been closed.
Go to Pay > C. In Year Movements > F. Create Employer Payment Submission.
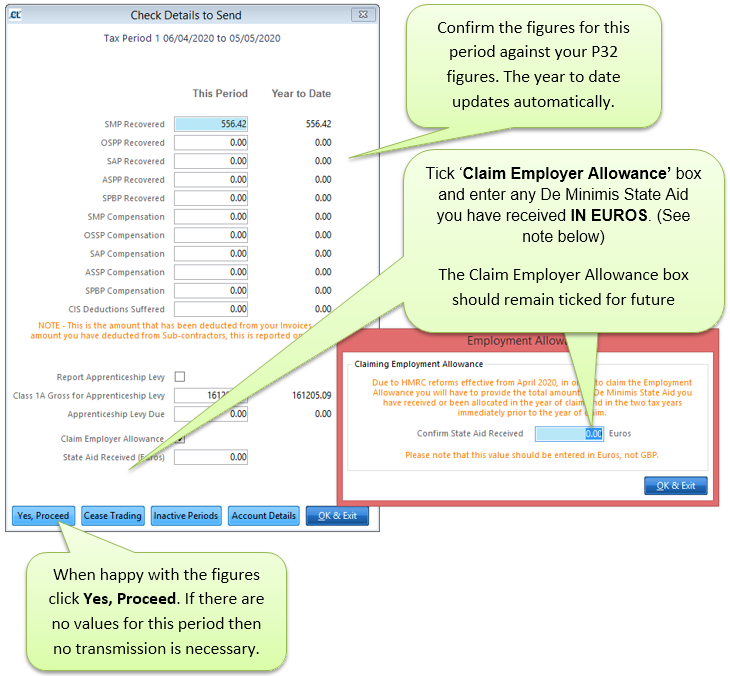
NOTE: What is the Employment Allowance (EA)?
Employers pay Class 1 NICs on their employee’s earning. The EA is currently claimed by employers to reduce their employers secondary Class 1 NICs bill by up to £3,000
Changes from 2020/21
This project seeks to remove EA from employers whose (secondary) Class 1 NICs liability was £100k or more in the tax year prior to the EA claim. As a result of the changes, approx. 100k larger employers who currently claim EA will no longer be eligible to claim in future.
Targeting EA in this way means it is now considered to be a type of de minimis State aid. This is because it is essentially placing some businesses in an advantageous position over other businesses on a selective basis which could potentially distort competition and trade within the European Union (EU)
As a result of these reforms the EA will be given from the 2020/21 tax year as de minimis State aid and HMRC will be responsible for ensuring customer compliance with those rules. Therefore, the EA application process needs to change to take account of the rules on de minimis State Aid.
In broad terms de minimis State aid is permitted because it is considered too small to affect trade and competition between Member States. To come within the de minimis State aid rules the aid has to satisfy certain criteria. The total of all de minimis State aid granted must not exceed a set sum for each sector. There are also various requirements covering the administration of the aid that must be met to monitor the delivery of the state aid. Under the current EU state aid rules, providing certain conditions are met, de minimis State Aid can be paid by member states and does not need to be reported to the European Commission.
Now that the cycle is closed you are able to process any P45’s for staff that have left in the pay period. For further information on this subject please refer to the Creating P45’s section of the help file.