Staff Information |
  
|
Staff Information |
|
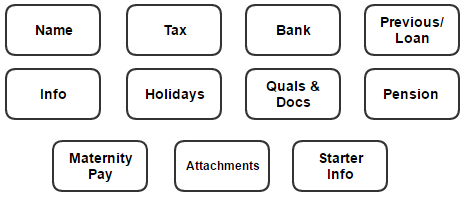
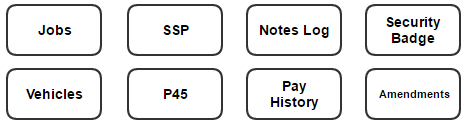
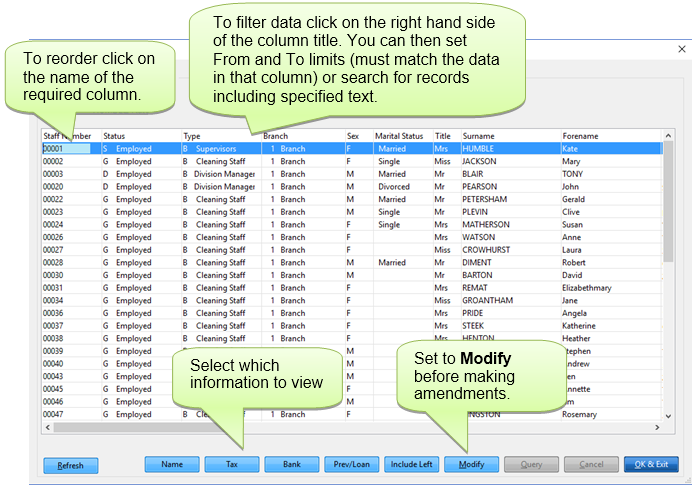
The data for each member of staff is arranged into 11 tabs and 8 buttons in their individual staff record. The data in the Name, Tax and Bank tabs can also be viewed using the Maintain Staff Browser Format option which enables multiple staff to be viewed together.
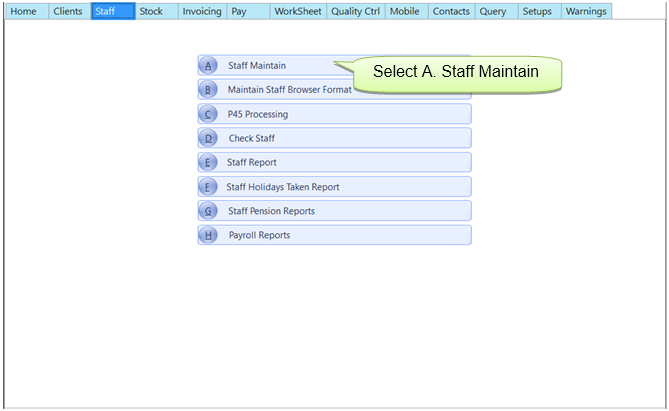
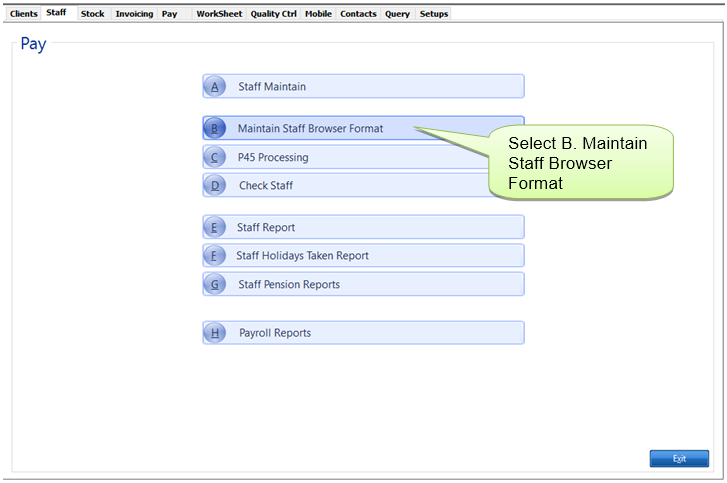
Individual staff records are accessed through Staff > A. Staff Maintain.

For details on each of the tabs and buttons click on the relevant button below.
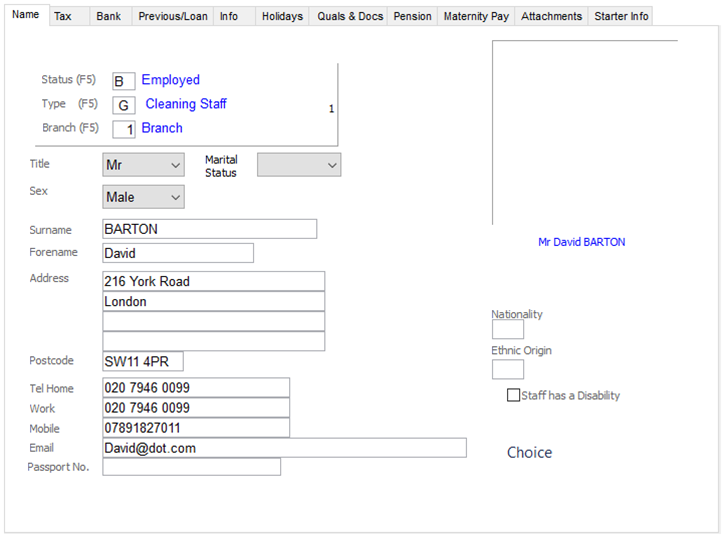
This list the basic staff name and address information. The fields in this tab can be amended by overtyping.
This tab list the staff tax information. The fields in this tab can be amended by overtyping. See below for a description of each field.
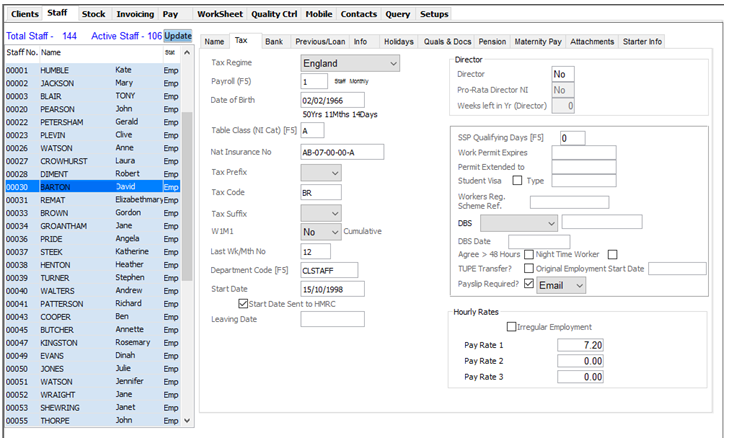
Tax Regime – Based on the employee post code.
Payroll – Staff are on a Pay Cycle No. i.e. Weekly/Monthly/Fortnightly/4 Weekly. This can only be changed if the cycle they are moving from is closed.
DOB - Date of Birth.
Table Class - National Insurance Table Class. The Staff Check Report advises if this needs to be changed, for example if the employee has reached State Pension age.
National Insurance No. - The Staff Member's National Insurance Number.
Tax Prefix / Tax Code / Tax Suffix / W1M1 - Tax status.
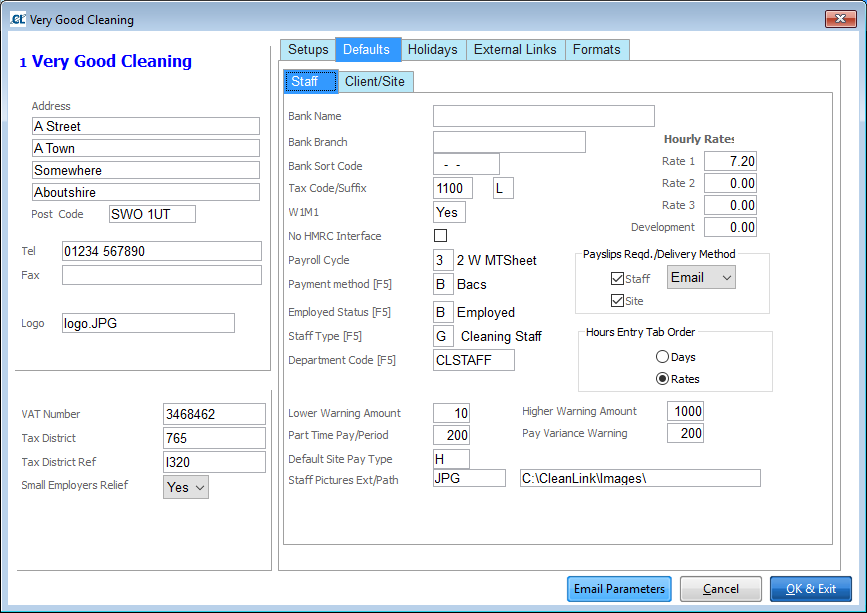
By default all new employees inherit the Tax Code, Table Class, Tax Suffix and W1M1 as set up in ‘Setups > B. Setups and Defaults > Defaults’ tab:
Last Wk / Mth No. – Defaults to the last completed Cycle for the pay cycle you have selected.
Department Code – Pay is analysed by departments, create the number of departments that your accounts package requires.
Start Date / Leaving Date - Start and End of employment.
Director / Pro Rata Director NI / Weeks Left in Yr (Director) – Marks staff as a Director for NI purposes, use the Pro-rata Directors NI and weeks left option if the employee becomes a director in the middle of a tax year.
SSP Qualifying Days – Statutory Sick Pay defaults to 1, Sun to Sat pattern NYYYYYN.
Work Permit Expires – Pay Anomalies report warns if expiring within 30 days and the Warnings screen shows date of expiry.
Permit Extended to – You can input the extended to date in the Permit Extended To field. Pay Anomalies report warns if expiring within 30 days.
Student Visa / Type - Select to indicate the Staff Member has a Student Visa.
Workers Reg. Scheme Ref. – From May 1 2004, most nationals of the new member states (except Cyprus and Malta) who wish to work for more than one month for an employer in the UK need to register under the Worker Registration Scheme.
CRB / CRB Date – Criminal Records Board check. Allows tracking, processing and approval of CRB checks and input of a ‘filed’ date.
Agree to over 48 Hours – Check if the employee has agreed to work more that an average of 48 hours a week. This relates to the EU Working Time Directive.
Night Time Worker – Check if the employee works at night. Information only for health and safety purposes.
TUPE Transfer – Check to show that employee is a TUPE transfer and enter a start date
Payslip Required – Tick to generate a payslip (only necessary if site details are not already set up to produce one for all site employees). Select in the box to choose whether you want this to be sent via Post, Email or SMS.
Hours Rate Pay Rate 1 / Pay Rate 2 / Pay Rate 3 – It is often preferable to use Site Rates and leave these fields blank. Pay rates can be entered in 4 different places. When the system looks for an hourly rate to apply, it first looks in the ‘Individual Staff at Site rate’ if this is empty it looks in ‘Staff rates’ if empty it looks in the ‘Site rates’ and if this is empty it will use the ‘Company rate’.
This tab holds the details for paying staff. The fields in this tab can be amended by overtyping.

Payment Method - Select the method used for Staff payments.
Bank Name / Branch / Sort Code / Account Number / Roll Number - Bank account details of the Staff Member.
Type of account – Some banks require this, rarely used.
User Code - Used on Printed BACS report, supplied by your BACS service provider
This tab holds the details of the employee’s previous pay and YTD figures. You can also set up and monitor loans to staff.

Previous Gross and Tax - Entered from P45 where available.
YTD Total Pay and Tax to Date – Normally never enter or change these figures as derived from processed data.
Loans – Used for automatic loan deductions up to a balance figure, such as season tickets.
Shows running totals for Outstanding Balance and Amount Repaid
P11 – Can be used to view P11 details at any time.
To Date Figures – Can be used to view P14 ytd figures up to last pay cycle update.
The Info tab is split into three sub-tabs. Misc contains miscellaneous contact and personal information, GDPR contains information relating to the General Data Protection Regulations, and DBS contains any information pertaining to the Disclosure and Barring Service.
Misc Tab
This tab contains general information along with emergency contact details.
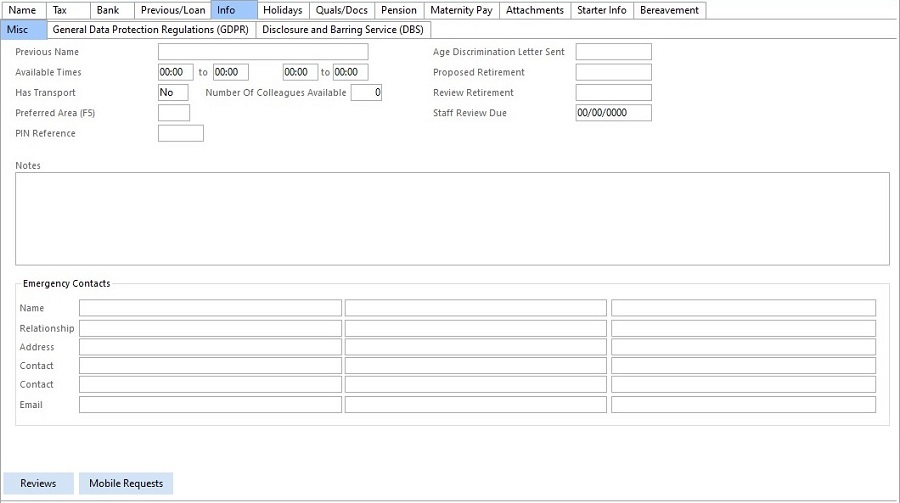
Age Discrimination Letter Sent – You should record here the date that the letter was sent. You can report on all staff without a date that are of retiring age. Staff changes that effect PAYE are recorded and can be seen in the ‘Main Menu > Pay > H. General Reports > Programs Run Log’. Other changes can be seen using the Amendments button.
Emergency Contacts - This data is sent to mobile devices.
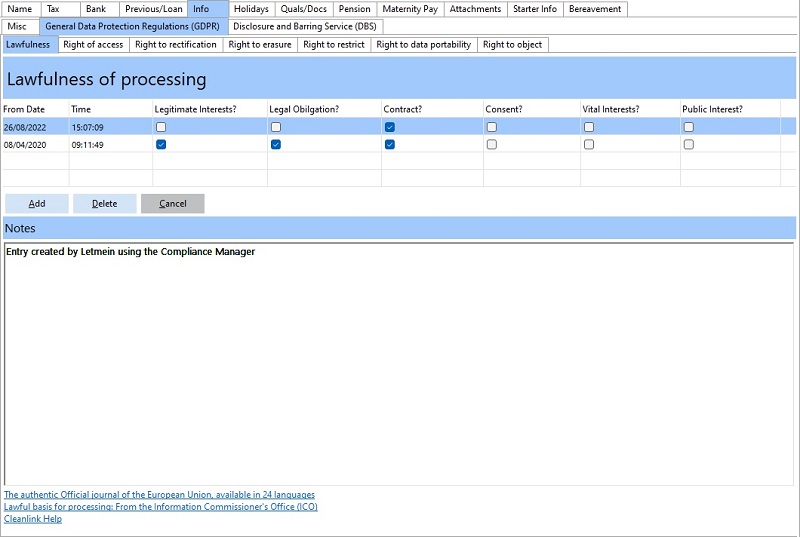
General Data Prodetction Regulations (GDPR) Tab
This tab contains all GDPR data relating to the employee. For further information see General Data Protection Regulations
Disclosure and Barring Service (DBS) Tab
This tab contains all of the information relating to DBS checks,

Check Type - Using the drop down box, enter the DBS type - Basic, Standard, Enhanced or Barred List
•Basic shows unspent convictions and conditional cautions
•Standard shows spent and unspent convictions and adult cautions, from the Police National Computer which have not been filtered in line with legislation
•Enhanced shows the same as a standard check plus any information held by local police that’s considered relevant to the role
•Enhanced with Barred List(s) shows the same as an enhanced check plus whether the applicant is on the adults’ barred list, children’s barred list or both.
Status - As the DBS application progresses, the status can be updated here.
Requested Date - The date upon which the application was originally made.
Certificate Number - This is the unique certificate number for this DBS application.
Issue Date - The date on which the DBS certificate was issued.
Renewal Date - This is the Employee's standard renewal date; The field will populate based on 3 years from the Employee's DBS issue date. The 'DBS Site Report' will include a more accurate renewal date for employees if the 'Renewal Period' on the Site record has been entered. See 'DBS Site Report' below.
Barred List Reference - This field is for recording if an employee appears on either of the barred lists when an 'Enhanced with Barred List(s) check is processed.
Checked by - This field is for the user to record who checked the DBS certificate when it was presented by the Employee.
Notes - This field is for general notes relating to the DBS application that are not recorded elsewhere.
Contains Info - Select Yes/No to indicate whether the DBS contains cautions and/or convictions.
Digital Check - Select Yes/No to indicate whether the DBS certificate was inspected digitally.
Risk Assessment - This field is only active if the "Contains Info" field is set to Yes. Users can record whether they have undertaken a Risk Assessment relating to the information reported on the DBS for this Employee.
DBS Reports
There are two DBS Reports available, one focused on the Site, and another on the Staff.
The DBS Site Report can be accessed by going to Reports > Clients and Sites > DBS Site Report

The DBS Staff Report can be accessed by going to Reports > Staff > DBS Staff Report

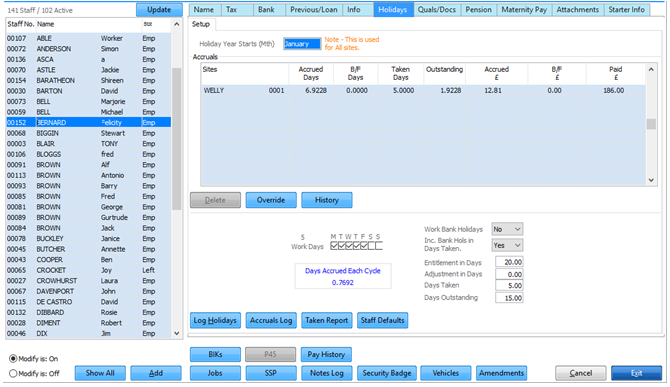
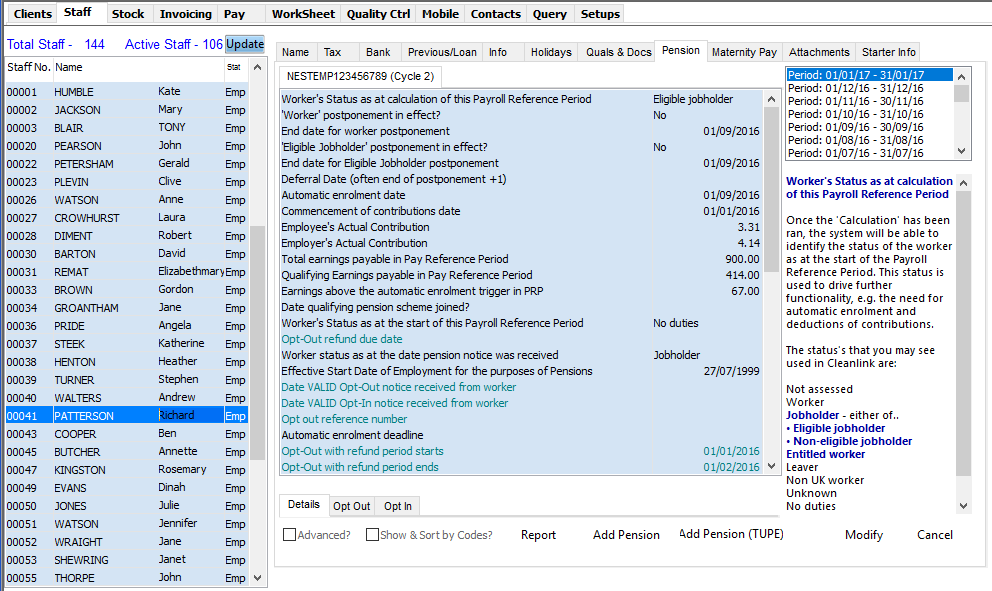
Staff Absences are logged on the ‘Holidays’ tab. See Holidays section for further details.
Qualifications & Documents Tab
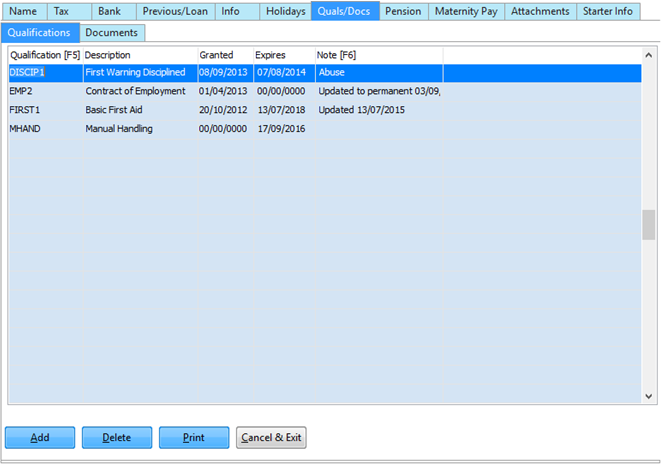
For details of Staff Qualifications and Documents, see the Managing Staff training help topic
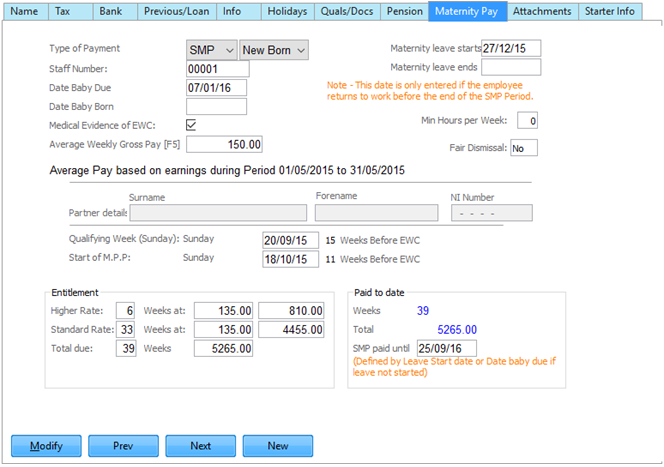
This tab records periods of maternity/paternity/adoption leave and calculates any payments required. For further information see Statutory Payments and Deductions.
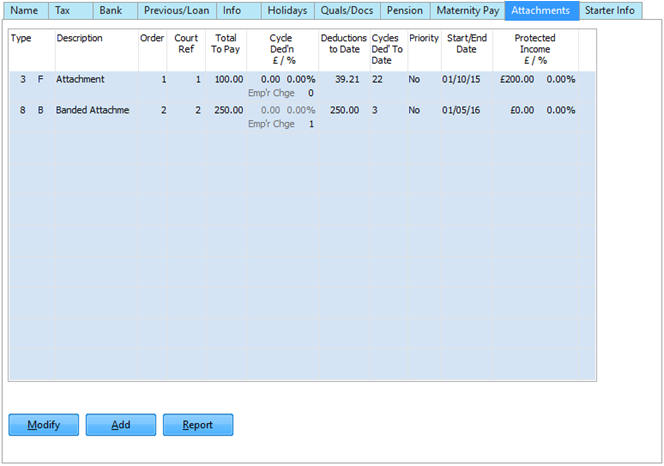
This tab records Attachments of Earnings for the employee. For further information see Statutory Payments and Deductions.
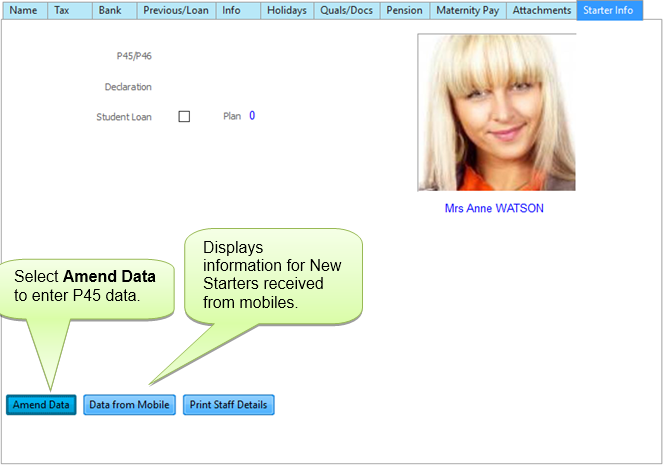
This tab records the employee’s new starter information. If the P45 was not available when the employee was first added it can be entered here at a later date.
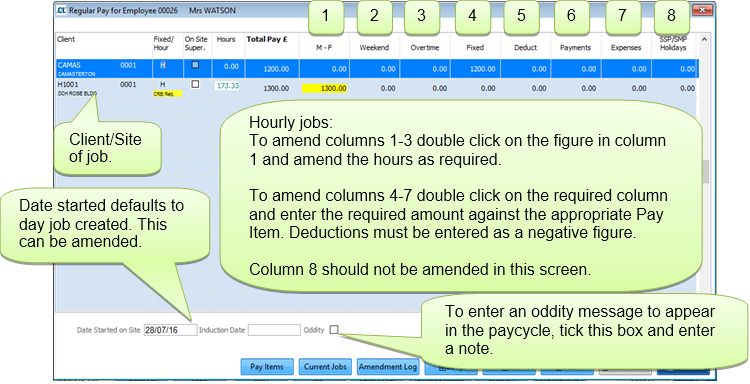
This page records the employee’s regular jobs. For further details on entering a new job see Assigning Staff to a Site.
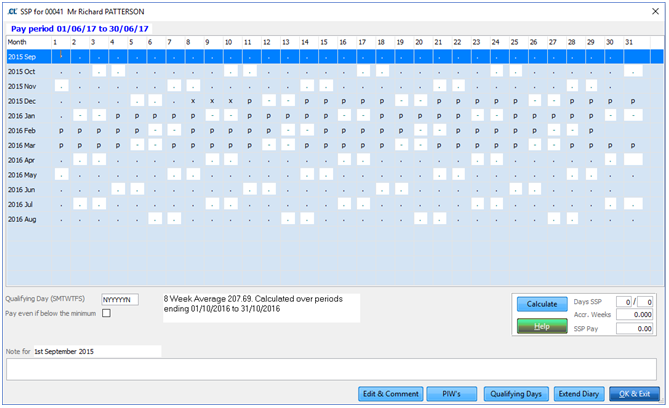
This page logs the employee’s record of Statutory Sick Pay. For further details on entering SSP see Statutory Payments and Deductions.
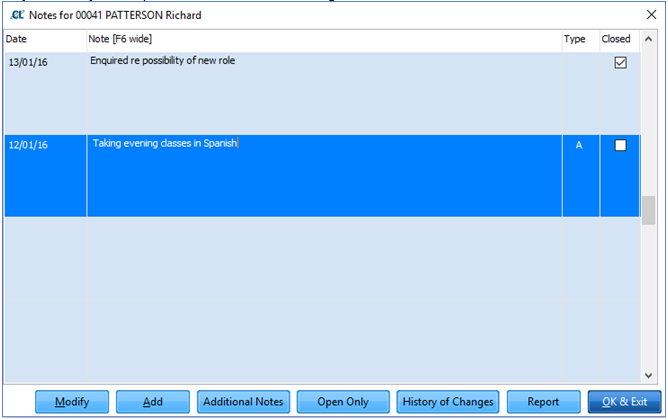
This page allows you to log notes about the employee. You can report on logged notes via Pay > G. Payroll Reports > AA. Staff Notes Log.
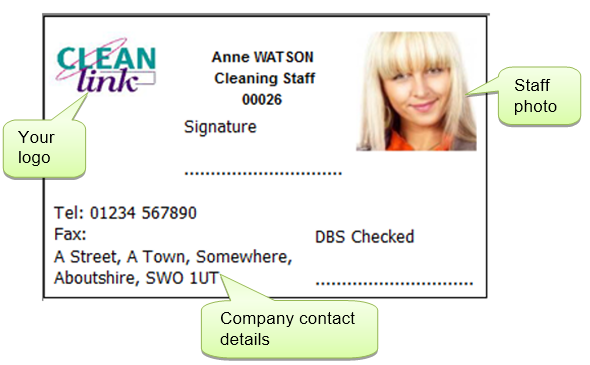
This button prints a security badge for the employee. There are a number of different formats which can be set in Setups > B. Setups and Defaults > Formats. The example below uses format 4.
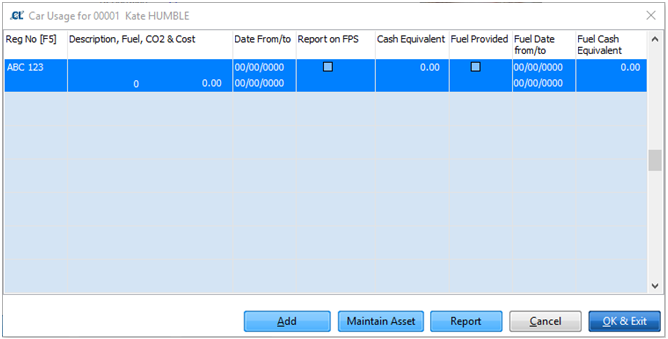
If the Staff Member has access to a company vehicle the usage dates can be recorded here. The vehicle must first exist in the Assets database. To add a vehicle, go to Setups > X. Assets & Vehicles.
Staff Number - This is set to the currently selected Staff Member and is Read-Only.
Registration No – Hit F5 to pick an existing vehicle
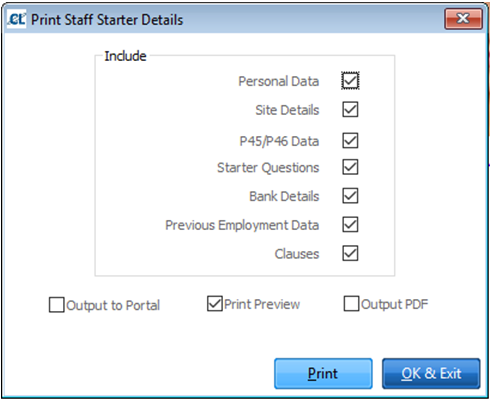
Click here to print a P45 for the selected employee, you can also print batches of P45s through Pay > C. In Year Movements > A. P45 Printing.
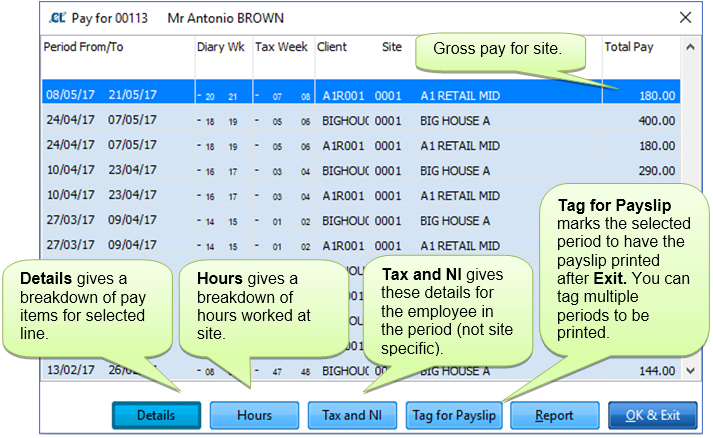
This page lists the employee’s pay history by site.
This option lists the changes to the employee's basic information, showing when the amendment took place and under which user name.
This option enables you to view data from the staff files for multiple staff at once. You can amend the order displayed to sort by each column and can also narrow results to those including a specified text.
Staff Defaults can be setup by going to Setups> 2. Setups & Defaults> Defaults tab> Staff tab
1. Set up Folder where images are stored.
Enter a path to the folder where the images are to be stored. Go to ‘Setups / B. Setup and Defaults / Defaults’ Tab and enter a path in 'Staff Pictures Path' (ensure the path ends in a \) and the type of picture in 'Staff Pictures Extension' like JPG, BMP, TIF (JPG recommended). You may find that your computer cannot handle certain picture types so experiment to find one that works and save all pictures to that format.
2. Take photo.
Save as nnnnn.jpg. Staff images must be saved with the same number the employee has been assigned in the staff file with your chosen extension, i.e. staff number 00001 requires the picture named 00001.jpg (assuming the JPG extension has been configured above).
3. Click on Show pictures.
If you have just set up the path in 1 above, exit CleanLink and re-enter for the path to take effect.In the Staff tab, go into the staff record and click on ‘Show Pictures’ on the right hand side to reveal the image. It is not necessary to be able to see it to print. A security badge can be printed by pressing the Security Badge button at the bottom of the screen (nine layouts are pre-supplied).